I’ve been so excited to share today’s piece with you guys! I actually finished it over a week ago, but I had so many other posts waiting to go … plus I had been bumping the wax giveaway post for several weeks so I had to get that one up last week (by the way, the winners have all been notified via email and are Pat, Laura & Sheri).
OK, so on with today’s post!
You’ll remember that back when I shared a tour of Jackie’s garden (here and here), I mentioned that she had offered me a free dresser.

Obviously it had seen better days, that’s why it was free.
Let’s start by identifying the issues.

My handyman neighbor Ken hauled this piece next door to his own workshop to give it a complete overhaul.
He started by removing that odd strip of wood that had been added to the bottom front of the dresser. I suspect that was added at some point as a quick fix to hold the dresser together. Ken took it off and then glued and clamped those joints back together. He also removed the top of the dresser and re-glued it with dowel pins.
Next he replaced one of the drawer slides for the top drawer that was missing from the inside. That was why the top drawer was sagging down on the right side.
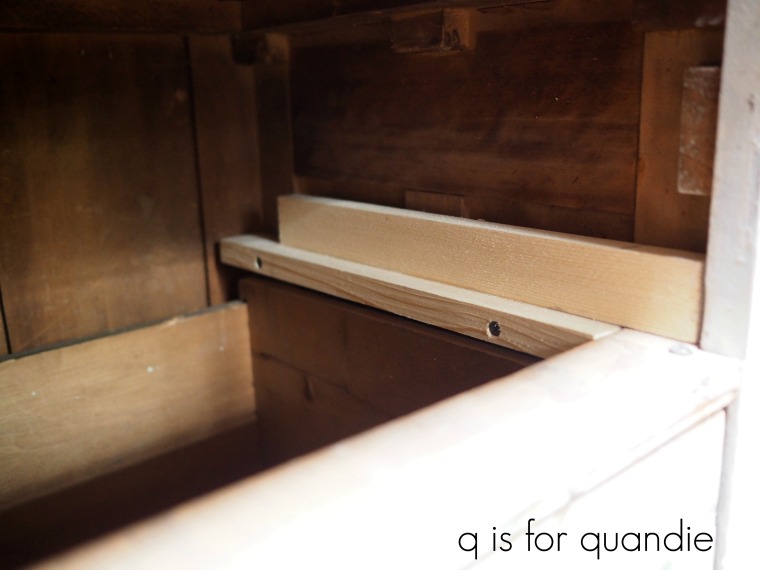
Then he also built up the bottom sides of that drawer.

The sides of a drawer can wear down after rubbing on those slides after 75+ years or so! That causes the drawer to tilt backwards a bit at the top when it’s pushed in.
As you’ll see shortly, the top drawer now sits in place perfectly thanks to Ken’s repairs.
Once the repairs were all finished, I stripped and waxed the top of the dresser using my usual technique. Stripping with Citristrip, cleaning, sanding and then waxing with Miss Mustard Seed’s Antiquing Wax.

When I have a piece with a solid wood top like this with plenty of stains and dings, I prefer to leave them. I love the patina they add, the sense of age and of this being a piece that was well used.
Next I sanded the rest of the piece and cleaned it well using Krud Kutter kitchen degreaser, followed by a rinse with clean water.
The chippy, vintage look of milk paint is perfect for these antique Eastlake style pieces so I pulled out my stash of partially used bags of milk paint. I had just a small amount of paint left in three different colors, Homestead House Raw Silk, Homestead House Casement and Miss Mustard Seed Marzipan. None of them would have made enough paint for the entire piece, so I mixed them all together which ended up creating the perfect creamy color for this dresser.
I ended up doing three coats of paint on the body of the dresser to get good coverage with the light color over the dark original stain, but I only need two coats on the drawers fronts which were already painted white. I had briefly debated the idea of just leaving the drawer fronts as is, but once I started painting the rest of the piece I could see that they really needed fresh paint as well.
Next came the really fun part of this project. I went through some of the new transfers that Prima Marketing sent me from their re.design line. I pulled out an amazing floral design called Rose Celebration that comes on six sheets (two across and three down) and is a whopping 44″ wide x 30″ tall.
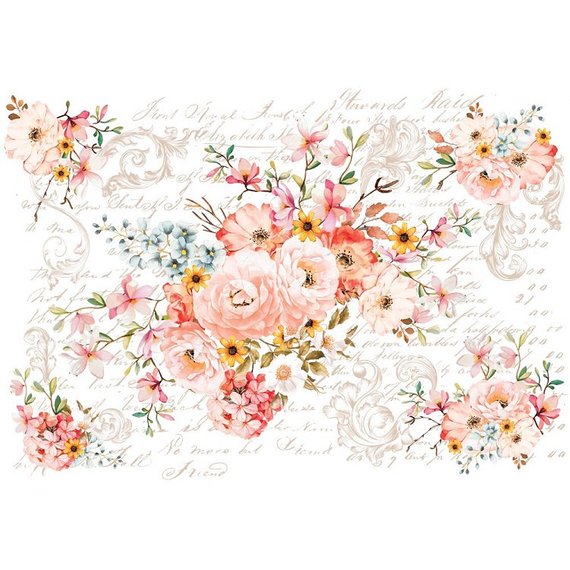
I really debated whether or not to use it on this dresser because the drawer fronts are only 32″ wide, so I knew I would be trimming about 6″ off each side of the design which felt sort of sacrilegious. But in the end I decided what the heck. I’m never going to find a dresser that is perfectly sized for the transfer, better to modify the transfer than endlessly search for a piece exactly 44″ wide, right? Plus, since this dresser came from Jackie and she has such an amazing garden, it seemed entirely appropriate to go with this gorgeous floral transfer.

A quick q tip: before you get started with one of these transfers, lay it out on a large table (or in my case, your baby grand piano) and make sure you have the pieces ready to go in the right order.
I then put the dresser up on some horses so that it was at a convenient height to work on. With the drawers in place, I measured to find the center of the front of each and marked it with a pencil. Next, I trimmed off most of the excess 6″ from the left side of the first sheet I’d be working with just to make it more manageable. Then I removed the backing paper from the transfer and lined up the center of the design with my pencil marks at the center of the top drawer. Once I was sure I had it even and level, I pressed it into place with my hands. Before continuing on, I used a razor blade to trim the transfer more precisely on the left side and to slice the plastic sheet at the top and bottom of the drawers so it would lay more flat. Then I used the wooden stick that comes with every transfer to apply it to the drawer.
Next I lined up the top right side piece of the transfer and followed the same process. Then I moved down and lined up the top of the next piece with the bottom of the piece that was already applied above it.

Lining up the design was similar to lining up a repeat pattern on wallpaper. If you’ve ever wallpapered, you will easily be able to line up one of these transfers.
I just continued to follow this process and applied the transfer going across and then down the rest of the dresser.
Keep in mind that perfection is not the name of the game here. There were a few spots where I didn’t get the transfer adhered entirely, and things got a little kittywampus as far as keeping a straight line all the way across. But as you’re about to see, that is entirely unnoticeable in the finished piece.

OK, you’ve gotten this far into my post and you’re probably dying to see the whole picture. I won’t leave you in suspense any longer.
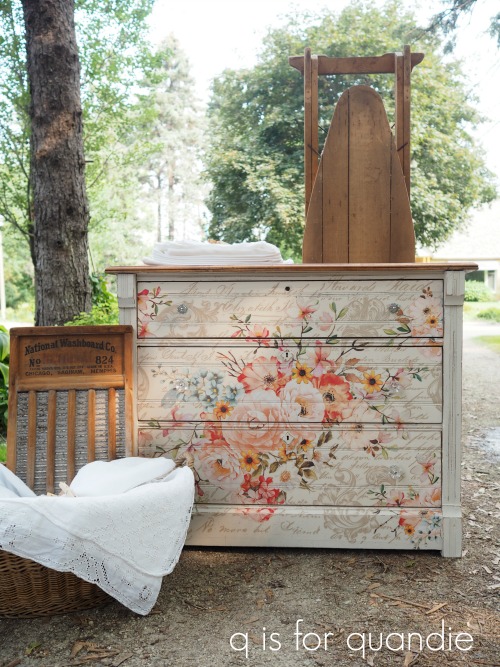
What the what? How amazing is that?
You might be wondering at this point what happened to the mirror. I like to remove them and turn them into separate pieces and you’ll see that later in the week, so stay tuned.
But back to this dresser itself …

I could just sit around and stare at it because it’s so pretty.
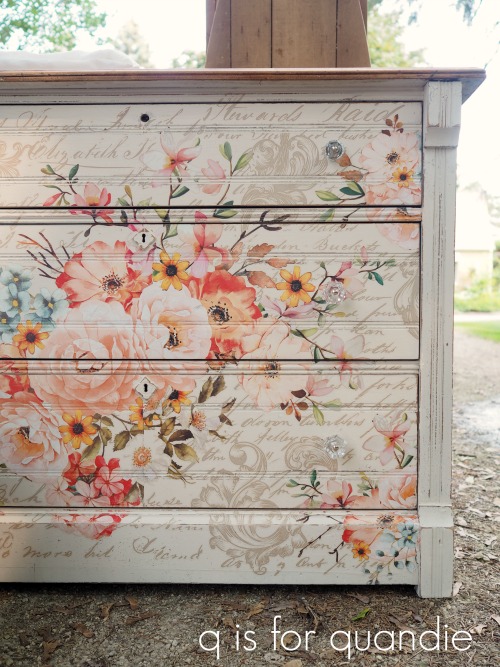
I like to use clear glass knobs on pieces with transfers because they don’t distract from the design of the transfers.
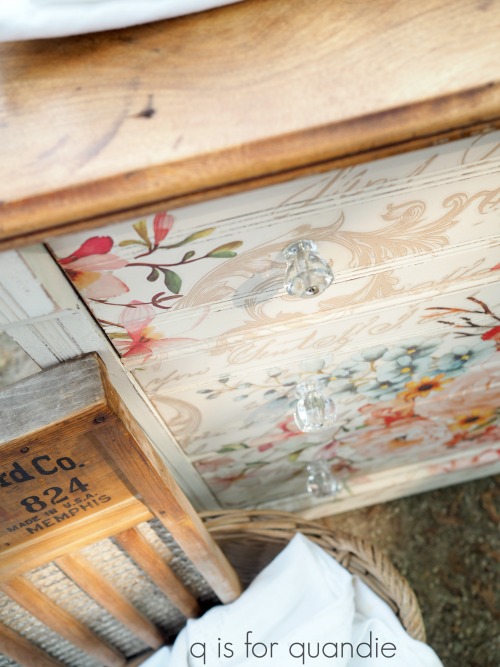
By the way, I have not added a top coat of any kind to the body of the dresser. To make the piece more washable, I would add the Real Milk Paint Co’s Finishing Cream in Dead Flat over the paint and transfer. That product is my favorite for pieces like this because I like the sheen (or lack thereof) and I like that its thick, gel-like consistency means little danger of drips (I’m bad about drips). If you aren’t as drippy as I am, the Miss Mustard Seed Tough Coat is also a good option. And of course, you could just use wax as well (yes, you can wax over the top of these transfers).
However, I have a couple of milk painted pieces in my own home including one with a transfer that I didn’t top coat and they have held up beautifully.

The top of the dresser is likely to see the most danger from sweating drinking glasses or other wet things being placed on it, and that is protected with the Miss Mustard Seed Antiquing Wax.

If you want to find out where to buy any of the Prima Marketing re.design products near you or online, check out this link to their ‘where to buy’ page.

I have to say, I am very proud of the work that both Ken and I did to salvage this dresser. It always feels good to take a piece that most people would have chucked into the bin and turn it into something beautiful.

If you are local and in need of a beautiful floral dresser, be sure to check my ‘available for local sale‘ page to see if this piece is still available.


Oh my word! That is so beautiful. I cannot believe the before and after. Love all the colors and I love how it enhances the lines of this piece! You and Ken need to write a book about all these restorations! And I’m serious…..
LikeLike
Thanks so much Sheri!
LikeLike
You may have outdone yourself, Linda. It’s stunning!
LikeLike
It’s all about that transfer!
LikeLike
Dang girl! This. Is. Beautiful.
LikeLike
So, funny detail, this was actually my ‘least favorite’ of all the new transfers I received from Prima. Ha! I think that says more about how gorgeous they all are than it does about this one.
LikeLike
I can’t stop staring at it, either! It is gorgeous!
LikeLike
It really does catch your eye, doesn’t it?
LikeLike
This is the most beautiful piece of furniture! You are so gifted!! Thanks for sharing your knowledge and talent!
LikeLike
Thank you so much Julie. I don’t feel gifted, just lucky that Prima Marketing sends me these beautiful things to work with!
LikeLike
Your transformation on this piece is amazing! It is beautiful!
LikeLike
It really was fun to bring this one back to life 🙂
LikeLike
this turned out so gorgeous! Wonderful makeover!!
LikeLike
Thanks Debra!
LikeLike
That is perhaps your best to date! What an amazing transformation by a team of gifted folks.
LikeLike
I kind of feel like it might be too!
LikeLike
Wow! Just beautiful! I wonder how many transfers Prima Marketing has sold because of your awesome work?!
LikeLike
Hopefully lots!
LikeLike
Sheri said it today, and I’ve also mentioned to you that you definitely have the content for a book! Really lovely Linda!
LikeLike
Thanks Meggan! I don’t think I have time for a book and a blog. It would have to be one or the other.
LikeLike
Wow! I feel like I need to buy it.
LikeLike
It definitely is gorgeous, and in very functional condition!
LikeLike
With each picture of the reveal, I just kept saying, “It’s SO pretty!” You really have outdone yourself on this one. Amazing!
LikeLike
Thanks Annie!
LikeLike
Absolutely Beautiful
LikeLike
Thanks Laura! And congrats again on your win 🙂
LikeLike
This piece is stunning. I love this transfer. You did an amazing job. I am very partial to Eastlake dressers. They are some of my favorites to transform into something beautiful. Yours is exquisite ❤️
LikeLike
I love working with the Eastlake dressers too. They are gorgeous with the Seeds transfer on them as well. And we seem to have a lot of Eastlake dressers here in the mid-west. I’ll be on the lookout for more, because I do have a couple more fabulous transfers to test out.
LikeLike
Beautiful Linda!
LikeLike
Thanks Lisa!
LikeLike
Stunning.
LikeLike
Thank you Cilla!
LikeLike
That is amazing looking, Linda!!
LikeLike
Thanks Linda!
LikeLike
Lordy, Lordy, Lordy that is one seriously styling chest. I can’t believe you are not keeping this piece! Did Jackie see the finished piece? She just might want to come take it back! Great work love, love the color you painted it, kind of has gray undertones. And yes I want the flower rub ons. Got to save them for something special! Perfection.
LikeLike
I have such a small house. I wish I had space to keep more pieces like this one. And actually, there is another new Prima transfer that I have my eye on anyway! As for the color, good eye Laura. The Raw Silk definitely has some grey undertones so that’s probably the color that brought in the grey.
LikeLike
“Chucked into the bin” Ha, you’re so British!
LikeLike
It’s all that British TV I watch 😉
LikeLike
Just spectacular!!!! That’s all I can say
LikeLike
Thanks Donna!
LikeLike
She, referring to the dresser, probably feels like Cinderella on her way to the ball. Wait do I hear her faintly singing “I feel pretty oh so pretty”? Seriously this is the most brilliant transformation. You two killed it!
LikeLike
Love that analogy! I just hope she doesn’t turn back into a pumpkin at midnight 🙂
LikeLike
Wow, incredible beautiful transformation!
LikeLike
Thanks Jeri!
LikeLike
Awe, I’m in Love.
LikeLike
🙂
LikeLike
Lovely piece!
LikeLike
Thanks Valerie!
LikeLike
GORGEOUS!!
LikeLike
Thank you Jacqueline!
LikeLike
Gorgeous. This is magazine worthy. Good job Ken and Quandie.
LikeLike
Thanks Terri!
LikeLike
interested! What does the top look like?
LikeLike
There is a picture of the top. It’s the fifth picture down. As I mentioned, it’s dinged up and stained and I left those imperfections. It is stripped, sanded and freshly waxed though.
LikeLike
Awesome job Miss Quandie! I’m gonna miss you when you go on your trip!
LikeLike
Well, my cruise on the Adriatic is still a couple of months away. So you still have some time to mentally prepare 😉
LikeLike
Amazing!
LikeLike
Thank you Cyndi!
LikeLike
So pretty! Love the floral
LikeLike
It is a very pretty floral!
LikeLike
That free dresser is gorgeous! You and Ken did an amazing job saving that wonderful vintage piece that was close to unsalvageable. I thought, initially, the transfer might be too busy but boy was I wrong. It’s perfevtion and makes the dresser. It makes me want to give the Prima.redesign transfers another shot after my bad experience – the gazillion tiny bubbles (hi Mr. Q!) and it being so raised off the surface. The company did refund my money quickly but weren’t able to figure out the cause of the problems. I still have 2 small to medium sized transfers left from that same lot and am so tempted to try them again. I need your opinion. Should I re-try the transfers with the ones I have left from the same tube or just buy new again? I so badly want to create a piece as beautiful as what you and Ken have done!
LikeLike
If I were you I would practice with the transfers that you have left. And by ‘practice’ I mean put them on something that you won’t mind if it doesn’t turn out, or that will be simple to sand down and re-do. If you still get bubbles, it may be something wrong with that set of transfers.
LikeLike
Wow just beautiful, you have nailed it with the transfer, knobs and paint! Great job, wish I lived closer!
LikeLike
I was super happy with the shade of creamy white that I ended up with. That sort of got overshadowed by that gorgeous transfer, but it really was a pretty color!
LikeLike
Oh my that is absolutely gorgeous. I love it ans am now thinking of trying to get some transfers and pick up two dressers I have. Lovely,lovely from Betty believe it or not. Say Hi to .Mom and Sis
LikeLike
Mom is coming for a visit! She’ll be here on Saturday, so I’ll be sure to say hello from you Betty 😉
LikeLike
Such a wonderful difference. The little dresser turned out very sturdy after all.
LikeLike
Yes, that dresser is now perfectly sturdy and functional, thanks to Ken’s skills at repair!
LikeLike
Every time you blow me away! I cannot wait to read each post because I know it will be this fun….every time!! Wow you and Ken are the dynamic duo!
LikeLike
Well, I hope I can keep that up and never disappoint!
LikeLike
Very pretty! Does Ken ever see the completed projects and comment on them? What did he think of this project if he does? Just wondering! 😁 I love this piece!
LikeLike
Oh yes, Ken always checks out the pieces when they are finally done. And his wife Arlene often takes a look too. They both thought this one was gorgeous! Ken usually prefers the solid black or navy blue pieces, but he really did seem to like this one 😉
LikeLike
Stunning makeover! These beat up freebies are always my favorite makeovers. You gave it new life and a gorgeous new look. So pretty! xo
LikeLike
Thanks Denise! It is satisfying to salvage pieces like this 🙂
LikeLike
Wow, it is beautiful!!!
LikeLike
Thanks BFF!
LikeLike
This is lovely!
LikeLike
Thank you Elisa!
LikeLike
its beautiful but I am new to this type of project. where do you get such large designs from
LikeLike
This transfer is from Prima Marketing. They only sell wholesale, but there is a link to sources for purchasing them either online or at shops in the body of my post above. Check it out!
LikeLike
That is absolutely gorgeous. So pretty. I can’t believe you had to cut some of the transfer off. it is huge.
LikeLike
Yep, it’s a big one!
LikeLike