
I was hoping to have a fabulous vintage painted dresser to share with you guys today. And actually, the dresser itself is done. However, I haven’t had the chance to take photos of it yet. I could have raced through some not very well staged photos in the driveway, but this particular dresser deserves better. I kind of love how it turned out and I want to do it justice, so you’ll have to wait until next week for that.
Instead I’m going to share a few quickie garage sale makeovers today that I’ve finished in the the last couple of weeks.
I purchased this trio of goodies at the Tangletown sales back at the beginning of May.
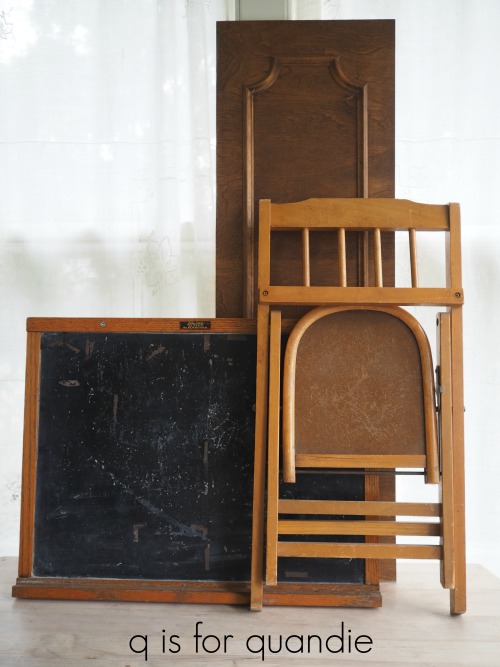
The vintage chalkboard was the easiest makeover. The chalkboard portion itself was in pretty rough shape from what I can only imagine were years of abuse.

So I sanded that down with my orbital sander and repainted it with Rustoleum chalkboard paint.
You might be wondering why I didn’t use milk paint for this chalkboard and the simple reason is that I wasn’t sure it would stick to this surface. I’m not even really sure what the surface of this chalkboard is. The label calls it a ‘slated blackboard’, but it didn’t feel heavy enough to actually be slate. What is a ‘slated’ chalkboard anyway? Do any of you know?
The Rustoleum chalkboard paint worked well on this surface, regardless of what it is.
Aside from cleaning it a little, I left the frame of the chalkboard ‘as is’. I love how worn and well used it looks.
Once the chalkboard paint was fully dry, I seasoned the chalkboard by rubbing chalk all over it and then wiping it away with a dry cloth. Next I used one of my favorite stencils to outline some lettering and then filled it in with chalk. I added some butcher’s string to hang it, and that was it.

While I had the chalkboard paint out, I also added some to the kid-size folding chair.
Here it is before.

In addition to turning the seat into a chalkboard, I also added some Tim Holtz number rub-ons to the chair back.

Then I used one of my favorite methods for adding a chalk drawing. Check out my ‘how-to’ post on that by clicking the photo below:

You may recall the chair in that post hanging on the wall in my kitchen …
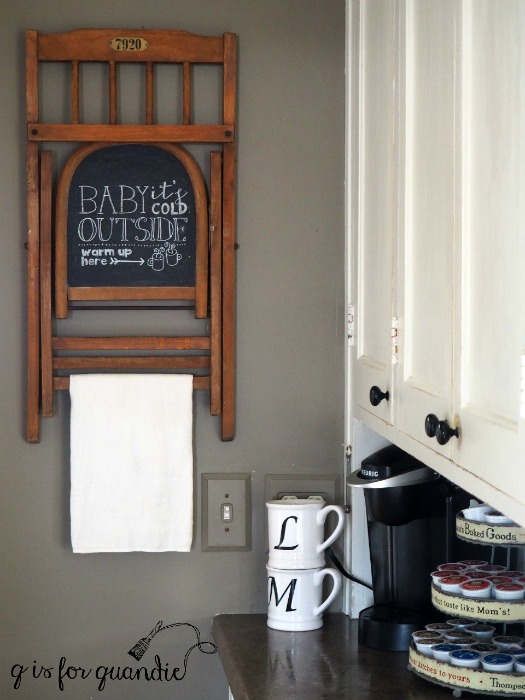
I just love it, so when I saw the nearly identical little chair at the Tangletown sales I knew I had to buy it and make another.
Last up is the random piece of paneling that I purchased for a dollar. I really don’t know what this came from, but I thought it would make a great sign.
I started off giving it a paint job.
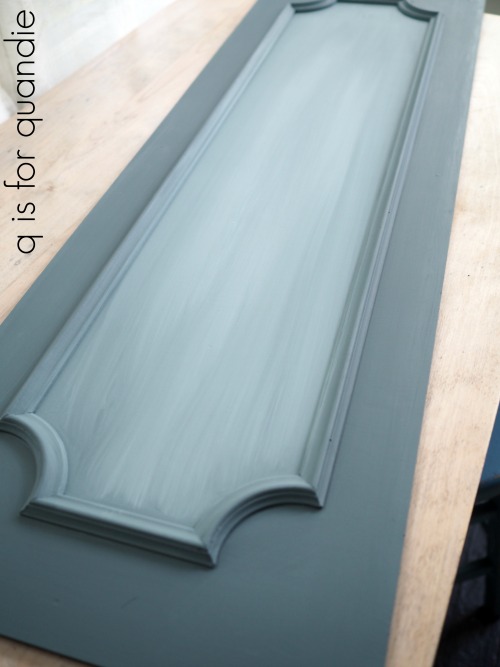
I was playing around a bit with using water and chalk paint and blending two colors into each other.

I used Dixie Belle’s Stormy Seas and Savannah Mist which work beautifully together. I don’t think I’m ready to attempt this technique on a piece of furniture yet, but it was fun to practice with it on this paneling.
Once I had achieved a look I liked with the paint I let it dry and then added a Prima Marketing transfer. You can find this particular transfer on Amazon.com for $10 right now.

Part of the reason I purchased this piece of paneling in the first place was because I already had this transfer and I thought it might just fit perfectly … and it did.
In fact the design of the transfer mimics the raised detail on the paneling almost exactly.

I could not have planned this better if I’d tried.
Now I just have to head to my local hardware store and figure out some way to add hangers to this piece. It’s pretty thin so my normal options won’t work. It’s also pretty light, so I don’t need something heavy duty. I’m thinking some sort of adhesive hanger will do the trick.
Be sure to check back next week when I promise I really will share that dresser, and as a bonus I might also have a gorgeous sideboard that I’ve been working on finished too!

Love all of the makeovers, but the blue sign is perfection. How amazing is it that the rub on fit with the same corners! And the blending is done very well. I am not a fan of so many of the makeovers using this technique but yours is perfect. Thanks for the Friday inspiration!
LikeLike
It was pretty amazing that the transfer fit so well. It was definitely one of those things where I thought “hmmmm, I think this might fit” and took a chance. Usually it goes the other way for me and I’m way off on size … but this time it was perfect!
LikeLike
Fun projects! That stencil is made for that piece! Have you seen when people use pop tabs for hangers? You just nail them on and bend them out a little. They work really well!
LikeLike
I’ve not seen the pop tabs used with nails, although I have seen them glued on (for instance on the back of a plate you want to hang using E6000 glue). The problem is that this paneling is too thin for a nail. But I bet I could glue them on, much like with the plates. Since the paneling is rather light, I think it would be sufficient to hold it up. Hmmmm … good idea Meggan!
LikeLike
Honey, you need to change that “Baby it’s cold outside” chalkboard! Dang it’s been hot recently!
LikeLike
LOL, yeah, I know! I planned to switch it over to a summer design when I did the other chair, but somehow I missed getting around to that 😉
LikeLike
Great finds and great job! I too have been practicing blending colors. It’s not quite as easy as it looks! 😂
LikeLike
It definitely is not. Also, I think this is one of those things that tends to look better in photos than it does in person. Since I sell my furniture ‘in person’ I need my pieces to look good up close and personal. I will continue to practice with the technique but I’m still not sure I’ll ever use it on a piece of furniture. Then again, you know my motto, never say never!
LikeLike
I love the chair, chalkboard, and piece of paneling. Your work is always so inspiring! I just did my first IOD Transfer. It’s a colorful set of flowers. I ran into a problem – it had tons of tiny bubbles everywhere that would not press down. Have you ever ran into this issue or is it supposed to have tiny bubbles? I’d prepped the surface per instructions and applied over Fusion paint that had cured for 7+ days. I figure if anyone knows about this, it would be you! Ant help or suggestions as to why this happened would be greatly appreciated! Thank you for all you do!
LikeLike
Hmmmm. No, I have never had a problem with bubbles. In the past I have mostly only used the older IOD transfers that were from Prima Marketing and were not in color. However, I did apply one of the newer Prima Marketing re.design transfers (these are not IOD transfers) to the wall in my guest room. That one is in color and has large flowers, and no bubbles. I know that Iron Orchid Designs has now branched out on their own and they have a new line of transfers coming out that are not affiliated with Prima Marketing so I’m wondering if you’re using one of those new transfers. I’m sorry, I wish I could be more help but I just haven’t ever run into that particular problem. Keep me posted if you find out what is causing it!
LikeLike
The IOD Color Transfer (re-design decor) It does say Prima on it. I emailed The Purple Painted Lady, who I bought this from, about the issue. She said she contacted the IOD company about it and would get back to me when she heard back from them. If I get an answer, I will definitely let you know why this happened so it doesn’t happen to you on your beautiful work! I do have to say that despite the bubbles the design is beautiful, detailed and vintage looking!
LikeLike
The Prima re.design transfers are not affiliated with IOD (Iron Orchid Designs). I know that can be confusing, it was to me too. But since your transfer is a Prima Marketing re.design transfer, as was mine, I’m totally baffled as to what went wrong. I’ve used several of their new re.design transfers now and not encountered bubbles. I just used one over Fusion paint and had no problems (I’ll probably share that project next week) I hope you get some answers!
LikeLike
ChrisT, you must have been channeling your inner Don Ho!
Tiny bubbles
In the transfer
Make me wonder
About IOD
LikeLike
I love Mr. Q’s sense of humor! I’d forgotten all about Don Ho’s “Tiny Bubbles’. My husband had to remind me! LOL
LikeLike
Love the chair and that you use it as a towel holder.
LikeLike
It makes an awesome towel holder 🙂
LikeLike
Love all three pieces. My favorite is the old slate chalkboard. The stenciled lettering is perfection.
And your paneling sign just darling.
LikeLike
Honestly, I so wish I could just write like that without a stencil but I’ve never mastered that art. So stenciling it is the next best thing!
LikeLike