
You’ve probably heard the terms ‘cerused’, ‘lime waxed’, ‘pickled’ or ‘white washed’. I don’t know about you, but I’ve always wondered what the difference is between them.
Well, I did some slapdash online research and today I’m here to clear that up for you.
First of all, all of these treatments are designed to lighten up the look of a wood surface without covering up the grain. They just achieve that in different ways.
How to ceruse or lime wax wood.
Let’s start with ‘cerused’ or ‘lime waxed’. These two are basically the same thing. According to gohaus.com: Back in the 1500’s, the French invented a technique of filling in the grains in oak beams and paneling with a toxic paste derived from lead. This was initially done to help prevent rot in oak beams. … Today that stylish finish is still called limed oak in Europe and here in the US we call it cerused wood or cerused oak.
Oak is the best wood for a cerused or lime waxed look because it has an open grain that gives the best effect, however you can use this treatment on other woods like pine or maple. You just won’t see quite as much definition in the grain.
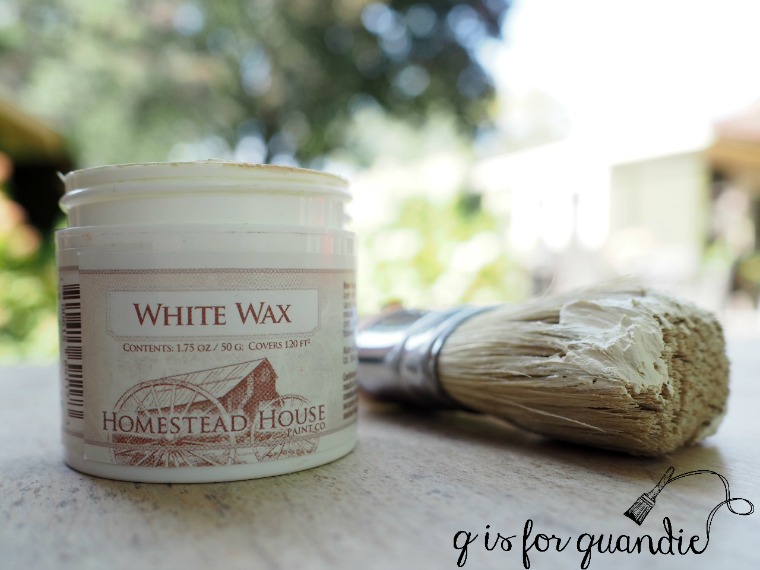
Instead of using a toxic paste derived from lead (ewwwww), I recommend using a much more environmentally friendly white wax such as the Miss Mustard Seed or Homestead House white wax (same thing, different labels). I know there are other manufacturers of white wax out there (if you have a favorite, feel free to share that info in a comment), but be sure to pay attention to the ingredients of your wax before using it indoors or without gloves. To read more about the safety of wax products check out this post. I like that fact that the Miss Mustard Seed and Homestead House waxes don’t contain any aromatic hydrocarbons (cancer causing particles that are present in some other brands of wax).
To prep your surface for lime waxing first strip off any existing finish. I like to use Citristrip for this, but if you’re a sander instead of a stripper you can go that route too. If you use a chemical stripper be sure to neutralize the surface with some vinegar water afterwards and then rinse with clear water. Either way, you want to be sure to completely remove any previous finish.

The next step is to raise the grain of your wood. The recommended technique is to use something called a bronze brush to brush the wood in the direction of the grain. You may be wondering, why not just your basic steel brush? That’s because steel particles that might be left behind can cause oxidization in your wood which will show up as black streaks over time (read this article for more detail). By the way, did you know that the same is true of using steel wool on wood furniture? I have a feeling that someone probably used either a steel brush or steel wool on a dresser I worked on a few months ago.
I don’t happen to own a bronze brush though, and I don’t want to invest in one just for lime waxing. So I read somewhere that you can scrub your wood with a green 3M scotch pad and a little water to get a similar effect. Also, this step is optional. The purpose of raising the grain is to give the wax more spots to get stuck in, ie. to emphasis the grain more. If that’s not a big deal to you, you can just skip this step.
Next work the wax into your wood. You can use a wax brush or a cloth for this. Start with a circular motion to get the wax worked into the wood. Follow up with a clean cloth moving with the grain to remove any excess wax, switching to a clean section of cloth as it becomes clogged with wax.
And that’s it. Pretty simple, right? It’s kind of hard to go wrong with this technique. Since the wax is a protective top coat in itself, you avoid the extra step of having to add a topcoat.

You can mix white wax with clear wax if you want less white. You can add a second coat of white wax if you want more white.
I used the Homestead House white wax on the top of this table.

How to white wash or pickle wood.
White washing or pickling gives a similar look but is done with either watered down white paint or a commercially made white wash or pickling stain. According to my research, white washing and pickling are very similar treatments but not exactly the same thing. When a piece is white washed, the stain or paint is applied with the grain and is best suited for woods like pine. When a piece is pickled, the stain or paint is applied against the grain and this treatment is best suited for oak. Personally I think that’s a rather fine distinction and that most people use these two terms interchangeably.
The prep process for white washing or pickling is the same as for lime waxing, and once again you can choose to raise the grain or not.
For the next step you can either use a white washing or pickling stain, or watered down white paint. If you plan to use watered down paint, I recommend preparing your solution and testing it on a spare piece of wood first. Actually, wait a minute, I recommend testing the stain first too now that I think about it. The ratio of paint to water is going to depend somewhat on how opaque you want it to look so a little experimenting before you start your project will really pay off. You can use any kind of water based paint for this technique, I like to use chalk paint.
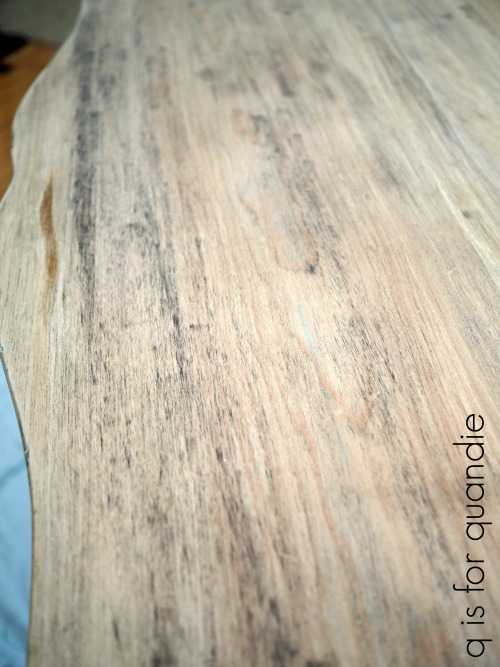
Next liberally apply the stain or watered down paint to your piece with a brush allowing a minute or two for it to soak in, then use a rag to wipe away the excess. You’ll go through a lot of rags, so be sure to have them on hand and ready to go. I used heavy duty paper towels when I white washed my cedar dining room table.

As you can see, white washing tones down the orange color of the cedar but still allows the characteristics of the wood to show (the knots and grain).
Once your paint or stain is fully dry, sand your piece with a fine grit sandpaper. Finally with this method you’ll also need to add your protective top coat of choice. I used Miss Mustard Seed’s clear furniture wax on my table.

You can read more detail on the white washing process I used on my dining room table here.
I hoped you’ve learned a thing or two about white washing v. lime waxing today. Check back later on Wednesday when I’ll share a piece where I used both techniques together. Sort of. In the meantime, be sure to pin this post for future reference!


As always …great information !!! Thanks !
LikeLike
You’re welcome Corinne!
LikeLike
Great info and timely as my next big project will be a dining table to white wax.I feel more confident now with your research as a guide! Thanks
LikeLike
Glad I could help Laura!
LikeLike
Thanks for clearing up a lot of questions in my mind. Wondering if you have covered dry brushing before? I just seem to make a mess of it when I try and would like to read better directions.
LikeLike
I’m not a fan of dry brushing, so I never do it. There is just something about it that doesn’t appeal to me, so I have to leave the dry brushing to others.
LikeLike
Good information. I learned something new today. Thanks Linda!
LikeLike
I learned some interesting facts while doing the research for this post myself. Especially that bit about the steel particles. Who knew?
LikeLike
I have always wondered at the difference in these treatments. I don’t care much for the look of painted oak furniture because of the way the wood grain shows through the paint, so using the cerused or limed finish to emphasize that aspect of the wood really appeals to me. Thanks for the motivation!
LikeLike
I always wondered too Kim!
LikeLike
I have wanted to do the liming or white wax method for awhile. Thanks for the great article! On the table you showed for the liming/waxing, what is the greenish or bluish color that you used on the bottom of table? And,type/brand of paint? I love the color with the white wax. Thank you so much!
LikeLike
It’s a custom mix of three different colors of milk paint, so unfortunately not a color that could be easily recreated. If you want to read more about it, that post is here.
LikeLike
Thank you, I have some of those, might try to see if I can come close. I do like it a lot!
LikeLike
It really is a pretty color. Even if you can’t match it exactly, you’re sure to come up with something equally as nice!
LikeLike
Can’t wait to try this on an old pine piece I have. Debi’s DIY wax is all natural and wonderful also!
LikeLike
Good to know. I love her videos, they crack me up every time. One of these days I’ll have to try her products.
LikeLike
Great info Linda! And the difference in your dining table is wow! The wash really cuts down on the orange and gives it a more modern look. Pinned! 🙂
LikeLike
Thanks Denise! It took nearly 20 years to convince my hubby that he’d still like the table with a white washed finish 😉 Since he’d built it himself, I didn’t feel like I could just do it while he wasn’t looking. But he’s just as happy with the result now as I am.
LikeLike
This was so helpful, and your example furniture pieces were gorgeous! I paint/refinish furniture, and yesterday I picked up a gorgeously constructed blonde oak dresser with awesome mouldings. I’ve been trying to figure out whether to white wash or white wax. I’ve only done a bit of white washing before, but I think this piece is perfect for white waxing. Thanks so much for laying it all so clearly!!
LikeLike
You’re welcome Becky, I’m glad my info helped 🙂
LikeLike
What is the best method for doing this with cabinets? Or is this not recommended? I want to tone down my cabinets but don’t necessarily want to full on paint them. Thanks.
LikeLike