

If there is one area in which I absolutely excel, it’s in learning things the hard way. I also tend to give you guys lots of advice, and then not follow that good advice myself. This past Saturday I worked on a project that was a prime example of both of these.
You see, I was so excited to start using my new IOD Decor Stamps on a piece furniture that I forgot one of my own best tips. I didn’t test my technique on a practice board first. Granted, I did test the stamps themselves first, but I used them over bare wood. I should have also tested how the ink would interact with paint. Instead I just jumped in at the deep end and then floundered a whole bunch!
But before we get there, let’s go back to the beginning.
Over a year ago my bff’s sister Laura called me and said that there was a vanity free at the curb in her neighborhood, did I want it? She was willing to pull it into her garage until I could get there to pick it up. Unfortunately I neglected to take a real ‘before’ picture of the vanity. But here’s the picture that Laura texted to me.
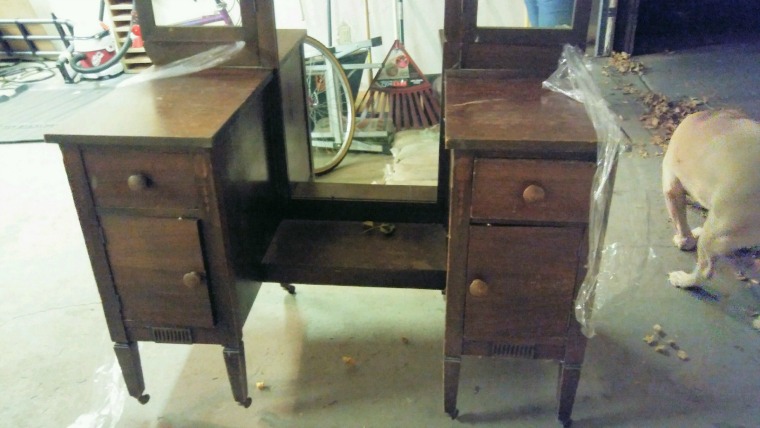
It was in pretty rough shape and the middle section was barely holding the thing together, so I decided to dismantle it and, with Ken’s help, turn it into two nightstands instead. I have a plan for the mirror as well, but that will be down the road.
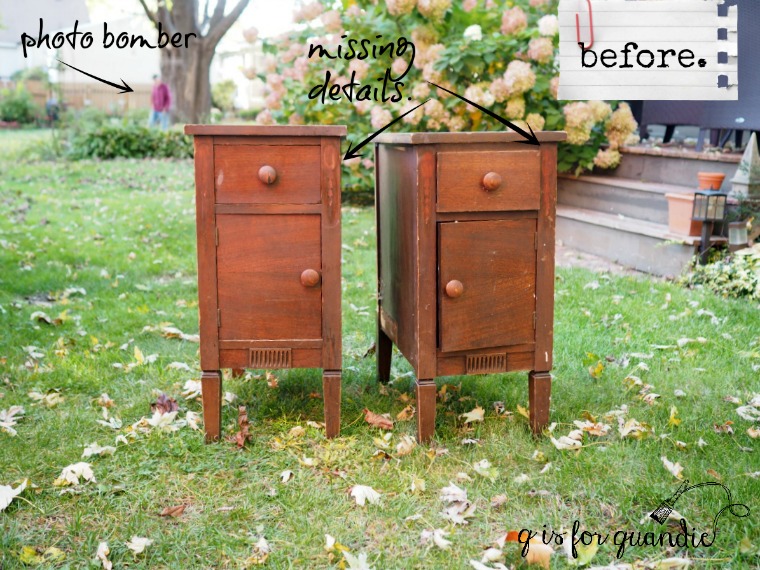
By the way, if you are new to my blog and don’t already know this, Ken is my next door neighbor. He can always come up with a clever way to fix stuff. In many ways, I think he is one of a dying breed. These days people tend to prefer to replace broken things rather than repair them. Ken is from the generation that repaired everything. And apparently he’s also a photo bomber! See him back there? And yes, that is his back yard, with my back yard in the foreground. He was actually on his way over to take a look at the repairs needed on this pair of nightstands when I took the photo (and yes, this was last fall when the grass was still green and not covered in snow).
I had a precise vision in my head of how I wanted these nightstands to look when finished. Imagine chippy, old, ethereal, delicate, feminine. Can’t see it? Well, stick with me, let’s see if we can get there.
My first step was to remove the big round wooden knobs. They weren’t terrible, but they didn’t work with my vision for the piece. Next I sanded lightly, cleaned with TSP Substitute and then painted a base coat of Fusion’s Little Piggy which is a very pale pink. I didn’t get a photo, but they did look really pretty in the pale pink. If I’d had enough Little Piggy to do a second coat, I could have just gone with the pink. Life would have been so much easier. But I was out of Little Piggy after one coat, and hindsight is always 20/20.
Next I added a little Homestead House Salad Bowl Finish (a.k.a. Miss Mustard Seed Beeswax) along all of the edges of each nightstand to provide a resist to the two coats of milk paint that I applied next. This is where mistake no. 2 comes into play. I wanted a warm white and I had several mostly used bags of various whites so I mixed them all together to give me enough paint for both nightstands. Again, this would have been OK, except for what happens later.
But for now the nightstands were painted and they looked amazing. I sanded them to distress and that looked amazing too. I got out my new IOD Decor Stamps (I used stamps from the Friffery set) and my Ranger Archival ink in a color called Watering Can.

I started small with a stamp on either side of the opening for the drawer. They went on perfectly and looked gorgeous! But 10 minutes later they looked decidedly less crisp. My first thought was to check my glasses, didn’t I have my ‘cheaters’ on? I did, and the stamp was definitely no longer as crisp. So I waited another 10 minutes and looked again.
 Oh boy, even worse. That was not at all the look I was going for. It didn’t take me long to figure out that the ink was bleeding into the milk paint. I should have sealed my paint before applying the stamp, mistake no. 3.
Then I realized that I didn’t have enough paint left to cover up the bleeding stamps. And since I had custom mixed the color, I knew I wouldn’t be able to recreate it perfectly. Sigh, mistake no. 2 coming back to bite me.
That’s when I started drinking.
No, not really. It was tempting, but it was still only about 10 a.m.
So instead I decided to back up a step and check my theory with a practice board. If only I’d done that in the first place!
I found an old board and painted half in Fusion paint (left side) and the other half in milk paint (right side). Once dry, I used The Real Milk Paint Co’s Dead Flat to seal the lower half of the milk paint side. Once dry, I applied the stamp to each section.

As you can see, sealing milk paint first will make all the difference if you want to use an IOD Decor Stamp with ink on your piece. Good to know for next time.
However, at this point I was back to square one. I needed to repaint my pieces in their entirety because I didn’t have enough paint to just paint over the stamps. It was time to re-think my entire plan and switch to Fusion paint.
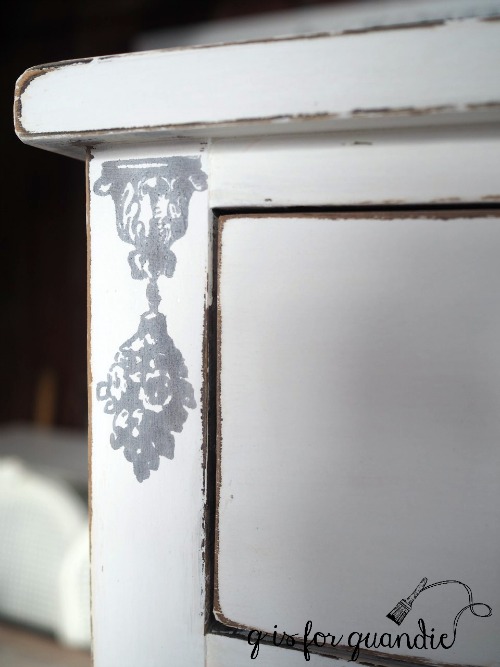
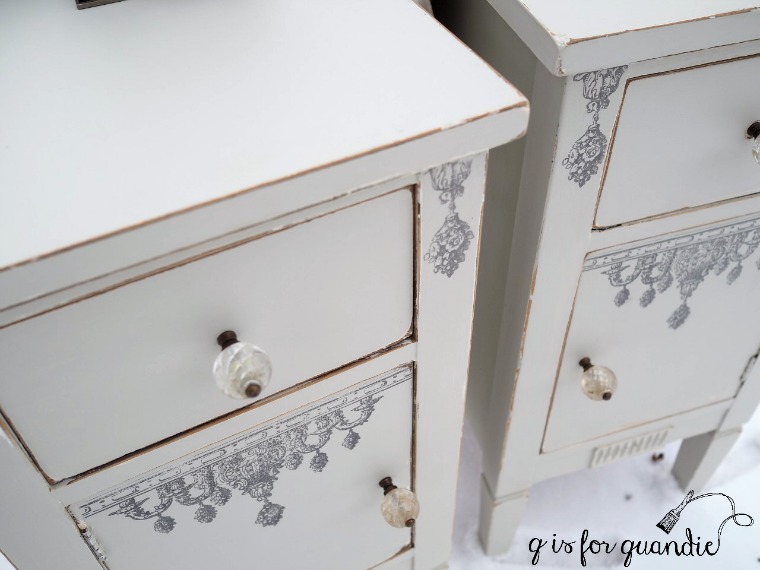
I was able to get away with just one coat of Fusion’s Putty, a pale grey, over the white milk paint. Once that dried, I added the smaller stamp on either side of the drawer opening. If you look back at the ‘before’ photo, you’ll see that I pointed out that these spots must have originally had some sort of carved detail. All that was left were the shadows showing where they used to be. I really liked the idea of replacing those with the stamp.

Next I wanted to use a larger stamp on the doors.
As it turns out, it takes a bit of finesse to use that big 10″ x 12″ acrylic block. You must make sure that your surface is perfectly flat and there are no other obstructions to keeping the entire 10″ x 12″ block flat. You know, things like hinges for example!
On my first attempt at stamping the door, the door itself pushed inward as I pressed down on the block. Ugh, mistake no. 4. I quickly realized that I should have taken the doors off so that they could lie flat while I stamped them. So I removed the doors, added another coat of Putty to them, and when that was dry I tried again.
This time around, when I went to press down on the acrylic block I realized that the hinges I’d left on the doors impeded the block. Mistake no. 5.

So after repainting the door fronts for a 3rd … or was it 4th … time, I adjusted where I placed my stamp on the acrylic block so that I could avoid those hinges. And this time, eureka! It worked!
Phew!
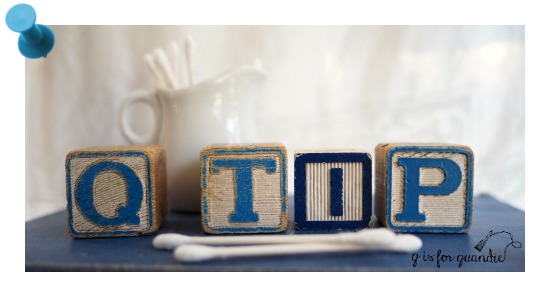
So let’s recap all of the Q-tips I learned while working on these nightstands.
- Do not use Archival Ink over unsealed milk paint, it will bleed.
- Do use Archival Ink over Fusion paint.
- Be sure to allow the ink to dry before rubbing over it to avoid smearing.
- Don’t use a limited amount of a custom mixed color of milk paint when experimenting with new products.
- When using the large acrylic block, be sure you can keep it flat and not hit any obstructions, like hinges or raised trim. Note: you can use these stamps without the acrylic block to avoid this problem, but I haven’t tried that yet. Maybe next time.
- Be sure the the item you are stamping can’t move (even the smallest amount) while being stamped, like a door or drawer that can move inwards. Instead remove them from the piece and place them on a firm surface while stamping.
- Have extra paint on hand just in case. It’s going to take some practice to get the hang of stamping on furniture, so be prepared to paint over the mistakes and try again.
- Don’t expect perfection!
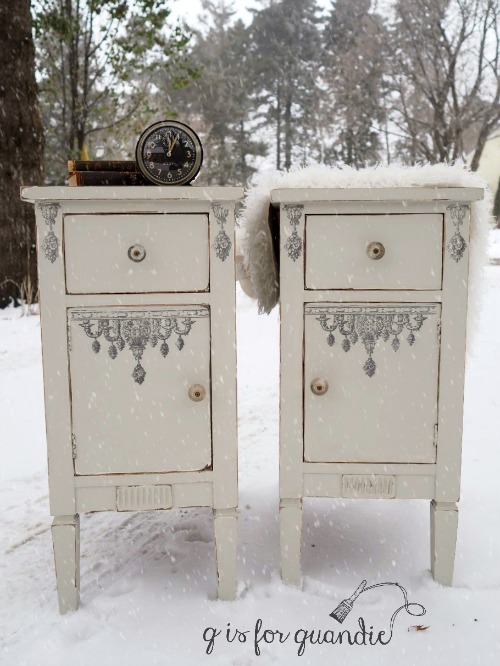
After much trial and error, in the end I think my nightstands turned out lovely. Did I achieve my vision of chippy, old, ethereal, delicate, feminine? Well, not entirely. Certainly not the chippy part, but maybe the rest?
What do you think?
And before I close, I wanted to point out one of the best features of the stamps. Buy them once, use them a million times. They can be used over and over and over. I’m planning to get lots of use out of them, especially now that I’ve learned how the hard way.

Wow, I’m tired just thinking of all the work you put into these nightstands. However, they look wonderful!!
LikeLike
It was a bit of work, but definitely worth it in the end!
LikeLike
They turned out lovely! You have a lot of patience! Looks pretty in the snow!
Blessings
LikeLike
Thanks Shelly!
LikeLike
Thank you so much for sharing your tips! I have stamps and a large block as well and that is next up on my to-try list so you have saved me a lot of aggravation and time ;). They look fabulous so I’m glad you stuck with it!!
LikeLike
I definitely recommend painting an old board with the same paint you’ll be stamping over, and then practicing a few times before moving on to your final project!
LikeLike
“That’s when I started drinking” 😂😂😂😂
Great info!! THANK YOU!!!
LikeLike
If I’d had access to that Christmas punch you were serving the other night this might have been a different story 😉
LikeLike
Beautiful little nightstands. They have so much character now. Sometimes all the trial and error pays off.
LikeLike
For sure! And the stamps did add a ton of character to what were otherwise fairly basic pieces.
LikeLike
I just find it so hard to believe that you could possibly make a mistake let alone 4 of them.But you persevered and if they were not so etching they would be beautiful. I guess by now you know it’s me Betty, but I am coming around. Love to Mom and Debbie (and to you too)
LikeLike
Well, funny enough, when I was chatting with Mr. Q about this project he encouraged me to include all of my mistakes in the blog post so that my readers know that I do make mistakes. And sometimes I make a lot of them! But if at first you don’t succeed, try, try again! Love to you Betty:-)
LikeLike
It’s so good to know that all of us painterly types have moments where a lesson can be learned. I kind of like teachable mistakes cause it makes you think on your feet. And I didn’t know IOD made those amazing stamps. Another thing to add to my wish list. I just finally ordered the flower pot rub ons. I love the finished product and love the ‘snow photo’. Another great Quandie project. Are you keeping those for the guest room?
LikeLike
Nope, my guest room is so small that even this petite pair of nightstands won’t fit. These will be for sale. You’re going to love those flower pot rub-ons! Let me know how they turn out for you.
LikeLike
Laughing over here…I bet some wine was had at the end of that day! Totally unlike you to goof up like that…you must have had other stuff on your mind maybe? The important part is that you continued moving forward until you got past each problem. And thats where the real Quandie shines … problem solving. Glad you hitched up your big girl panties and finished it up…looks great!
LikeLike
Nope, not really unlike me at all. I always jump in with both feet when I get a new product to try, and then make a bunch of mistakes along the way. You just don’t see it very often because usually I’m working with products that I’ve used a million times and already know their quirks. But I’m glad that I can share my mistakes with everyone so they don’t have to make the same ones!
LikeLike
Two words, impressed and encouraged comes to mind here. I am so impressed that you persevered. These tables are the perfect scale for either side if a twin bed. I already see them flanking an antique iron bed I picked up at an estate sale. I am not sure I have the same level of fortitude you have but I am encouraged that even a painter like the “great Quandie” still has a learning curve.
Pop those babies in Mary Poppins carpet bag and send them to South Carolina please! C.O.D.😘
LikeLike
I wish I had that carpet bag! Wouldn’t that be handy 😉 And I am totally picturing that antique iron bed. You’re right, that would be an awesome combo!
LikeLike
OMG! After all of that I would have had at least a glass of wine! The night stands did turn out beautiful. A BIG thank you for all of your experimenting. We(all of us that follow you) learn so much from your successes and your mistakes!
LikeLike
That really is the goal of my blog Monica, to share my experiences so that others can learn from them! So I’m glad I’m succeeding 😉
LikeLike
Quandie, your pieces turned out super duper awesome!! Yep, it seems that’s how we repurposers learn best — try and try and cry again! My example: I had painted an antique desk white, and as cute as ‘I’ thought it was, it just didn’t sell (maybe too big and bulky for just any home). So, then I repainted it a dark chocolatey brown. It didn’t sell then either, and I wished I had left it white. But I decided to turn regret into perseverance and asked Mr. Wright (my resident Mr. Fix It) to take the whole thing apart. “What?” he replied (his typical response to my crazy/creative ideas). I explained that I wanted to sell the bank of drawers separately and also use any other pieces of the desk that could be salvaged. In the end, I sanded the surfaces to a chippy white and chocolate look, which, to my amazement, was quite striking! Thanks to Mr. Wright, the end result included a bank of drawers, two side panels of the desk turned into coat hangers by just adding hooks, and bonus — the top is awaiting yet another project! Turns out, each piece sold quickly and brought more $s combined that I had originally asked for the entire desk. But most of all, I was just happy to redeem my oops of a project! 🙂 Cheers to never giving up, right? 🙂
LikeLike
Absolutely! And I’m so with you on dismantling something that isn’t working as is. Something the sum of the parts is greater than the whole, instead of the other way around 😉
LikeLike
Ah, now I feel like we are similar. When I’m working on my hobby projects in the basement, I always feel like it’s a process of going from one mistake to the next.
Glad to know we’re quite the pair!
LikeLike
Yep, we are quite the pair 😉
LikeLike
I like them! They have just enough character/detail to give them a great look…and I like your idea of putting the stamps where the old carved detail was….we are just getting ready to do the same type of project, splitting up a vanity to make 2 nightstands….Thank you for your “Q-Tips” 😉
LikeLike
There is another set of IOD Decor Stamps called “Hardware” that I also think would be fun to use to ‘replace’ missing details on furniture. I might have to put that one on my Christmas list! Best of luck with your project!
LikeLike
Thanks! I’ll check out those stamps too 🙂
LikeLiked by 1 person
Almost cried from laughter when I read that was where you started to drink…
LikeLike
LOL … if it hadn’t been so early in the day, who knows how this story would have turned out 😉
LikeLike
All your “lessons” made me laugh! I had a similar problem when I decided to paint the master bath vanity. I couldn’t decide on a color and when looking for inspiration I saw how you can use a stencil and spackle –or wood icing, etc–to add a raised design. It took me a few tries to find a stencil that would fit in the small area on the drawers. I liked the first try but decided to add scattered flowers to the door. It looked too busy to I had to scrape that part off! I finally decided to use the paint I already had so I mixed Pure White and Old While. It looked OK but the new “carving” needed something. That led to several fails–and lots of repainting! I finally added a touch of light gray to the raised designs and added “silver” knobs and pulls. It looks great now but now I think I need to paint the bathroom walls a pale gray! I need to find a project to use stamps on. Thanks for the inspiration and the laugh!
LikeLike
I always find I have that problem too Nancy, one update leads to another, which leads to another …
LikeLike
Linda your posts are so entertaining and your night stands turned out sensational! Seriously I learned so many lessons here so your stuff ups have saved me many a tear! Your hubby was right….sharing is caring (especially when it comes down to what NOT to do!)
Here’s to keeping it real! 🙂
LikeLike
Yes, here’s to keeping it real Hayley! It’s not all wine and roses here at q is for quandie … well, wine maybe, but not always roses 😉
LikeLike
You had all that drama but they look BRILLIANT now! Also….the “snow” staging is magnificent. Greetings from hot and sunny Melbourne 😉
LikeLike
I’m glad you’re enjoying my snowy photos from down under 🙂 I once took some quick ‘before’ photos (here) of some furniture on a snowy day a couple of years ago and I ended up liking them so much that I thought I would try to recreate the feeling with today’s photos!
LikeLike
I love this outstanding job you did here. You turned an gullying duckling into a beautiful swan.
LikeLike
Thanks so much Ivory!
LikeLike
They are lovely. Thanks for all your q tips.
LikeLike
You’re welcome Maureen!
LikeLike
They turned out wonderfully…and your learned something. It might have been the hard way….but sometimes you can’t learn things the easy way. Trust me. I am a teacher and when I make it easy for the students they don’t learn it. (Of course when I make it memorable, they do).
LikeLike
I have that stamp on order, but I haven’t seen it in person yet. Do you think I could use chalk paint rather than ink, or is the design too intricate? I haven’t ordered any ink yet and was hoping i wouldn’t need to. They turned out beautiful, Linda.
LikeLike
Personally I haven’t managed to keep a stamp looking crisp using paint. I know that other’s have managed that skill though, so you might be able to make it work. I’d say play around with it on some test boards for a bit before trying it on your actual piece.
LikeLike
It’s Jan, 2022 and I’m just reading this post. So educational! Thank you for sharing your great work, even when it doesn’t go smoothly. I learned so much reading this. The nightstands are adorable! I’m in love with the IOD Friffery Stamp. I found one for sale on ebay. Bidding starts at $510, or you can buy it now for $799.99 (shipping is an additional $14.99). LOL Unfortunately, that’s THE only one I found on the internet. I digress! Thank you for sharing so much with us. I always look forward to your emails.
LikeLike
What?! That’s crazy. I know it’s retired, but that’s just nuts. I wonder if you could find the stamp at a brick and mortar shop that sells IOD. They often have older stock. Are you local to me (Twin Cities)?
LikeLike