

I’ve been hemming and hawing a bit about my outside Christmas decorations this year. I really didn’t want to spend any money on them and usually I spend well over $100 on pretty evergreens to fill my planters. So initially I was thinking I would just skip the outside stuff this time around.
I’ve got to be honest and admit that part of the problem is my tendency to compare myself to other bloggers. I have been admiring all of the gorgeous decorating that some of the other bloggers out there are doing, and I really didn’t think I could measure up on my budget of $0. I really wasn’t even sure if I could measure up on my $100+ budget.
So the insecure defeatist inside of me decided to give up before I even started.
But then last weekend we had a bright and sunny (albeit a bit chilly) Saturday and I decided to at least put the twig lights up in my front window box. Once those were in place I thought, what the heck, I could certainly fill the window box with a few of the bazillion dried hydrangea flowers that were still on my bushes. Once those were in place I could see that the arrangement desperately needed at least a bit of evergreen, so I clipped some random clumps from my arborvitae hedge and threw those in.

And guess what? For a cost of $0 it looked pretty good. At that point I was on a roll. Why not go ahead and do the planter by the back door too?

I used some birch logs and some rusty metal ornaments that I already had, plus the same arborvitae and dried hydrangeas from my garden.

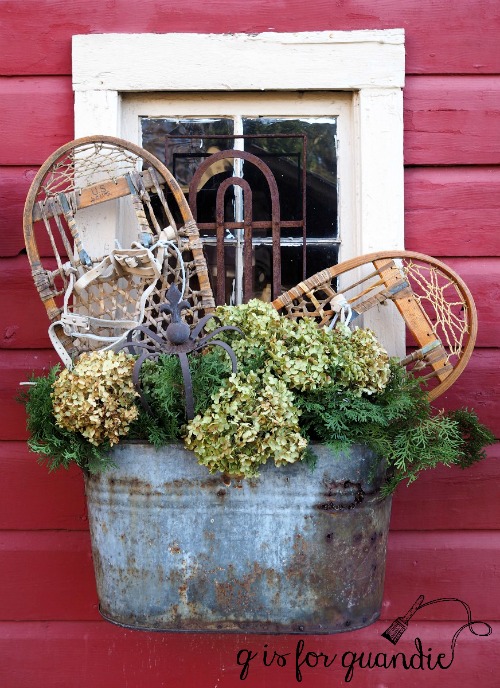
Next why not do the galvanized boiler planter on the side of the carriage house too?!
While working on that one I remembered the old pair of snow shoes that my neighbor, nnK, dug out of a dumpster for me.
What? Don’t your neighbors bring you treasures from the trash?

I wasn’t quite sure what I would do with those when she first brought them over, but I realized they would fit perfectly in this planter.
I just tucked them in the back behind the evergreens.
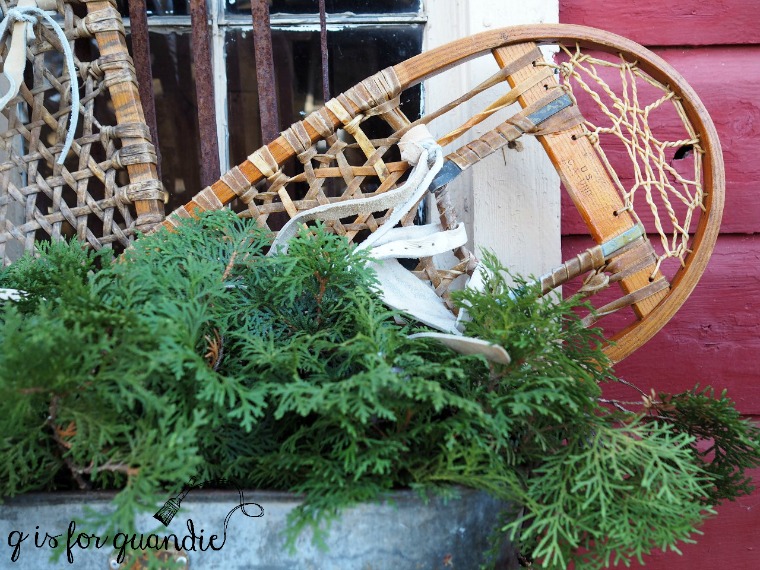
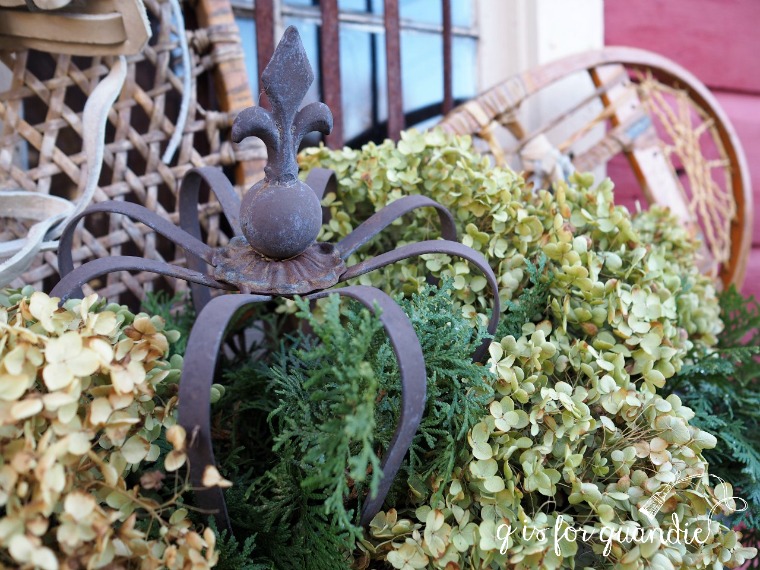
And then I added some hydrangea. As the crowning touch (pardon the pun), I tossed in a metal crown that usually sits in the garden.
It feels like the planter is positively bursting with stuff, all of which cost me again, $0.
But wait, there’s more!
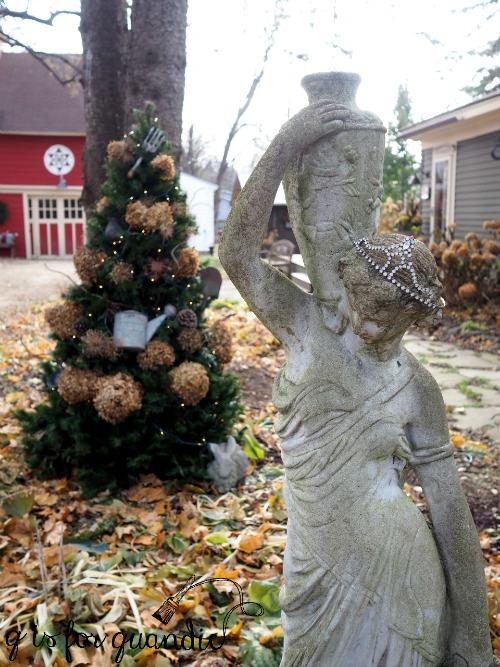
While I was digging around in the carriage house for stuff I could use, I came across an old fake Christmas tree that was also being discarded when I grabbed it (so again, $0). I’ve always thought it would be fun to have a Christmas tree out in the garden, but I’d never gotten around to putting it up before.
Up it went.
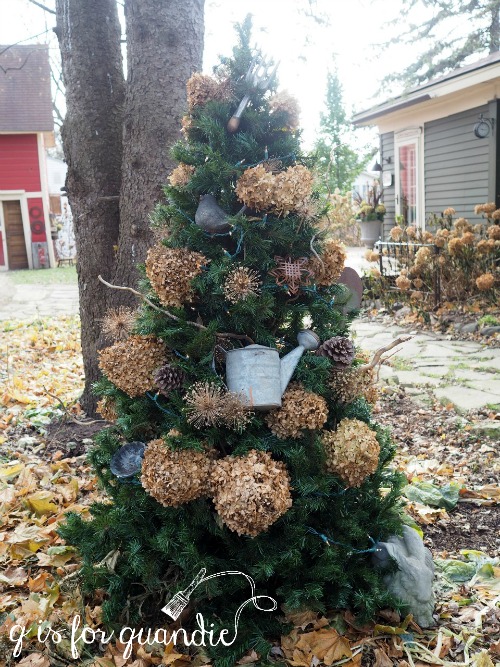
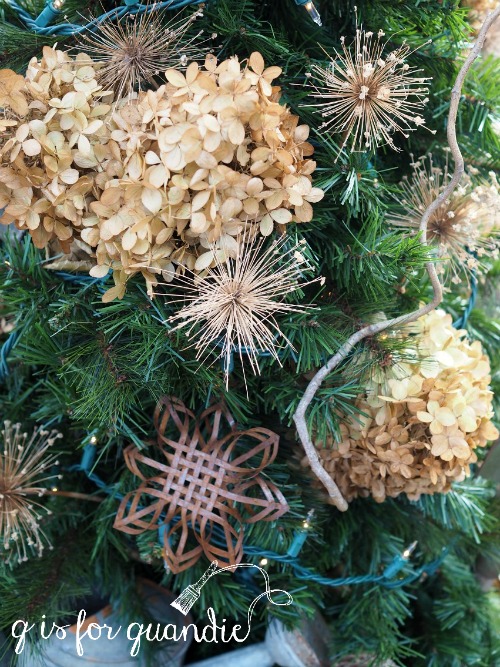
I added a string of white lights that I already had on hand, and then I decorated it from the garden.
In addition to the dried hydrangeas, I also used dried allium flower heads as well as some curly willow branches.
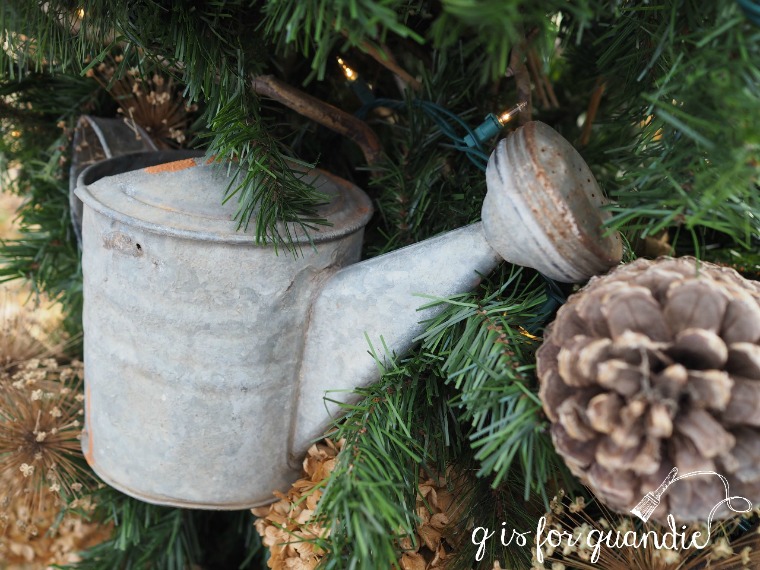
Then I tucked in things like this watering can …
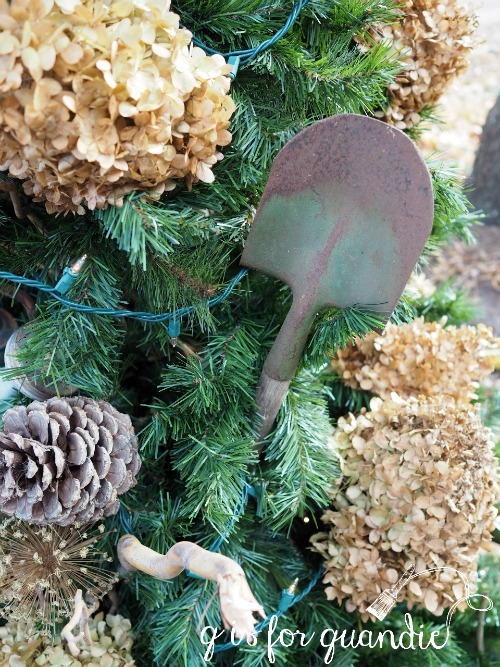
and a vintage kid sized shovel. Just fun vintage garden stuff that I already had on hand.
I placed the tree so that it’s perfectly centered outside the bay window in my piano room, just behind Cossetta, my statue. I love the way the tree looks lit up at night just outside the window. I think it will be even prettier when we get a bit of snow.
For spending $0, I think I did pretty good. I’ve definitely proven that you don’t have to spend a bunch of money to decorate for the holidays. I realize that not everyone has loads of dried flowers to harvest, or a spare faux Christmas tree lying around somewhere. But today when everyone else is out spending a gazillion dollars, I hope I’ve inspired you to think about using whatever you already have in a new way and decorating for free this Christmas!

Thank you!
LikeLike
You’re welcome Becky!
LikeLike
Very pretty!
Great job!
LikeLike
Thanks Cyndi!
LikeLike
“Comparison is the thief of joy.” I don’t know who said that, but it’s true. I’m glad you’ve found a way to decorate for free. I especially like the tree with the garden theme.
LikeLike
That sentiment is so true Fonda! I have to remind myself of that all the time.
LikeLike
I absolutely love this post! Using what you have Is an idea lost in today’s world. Thank you for the reminder!
LikeLiked by 1 person
You are so right Sharon. I think it’s especially an idea that has been lost on the internet as everyone is promoting various products and trying to get you to buy all new decorations every year. As much as I absolutely love real evergreen garland, having a variety of greens in my window boxes and real Christmas trees, they are expensive for something that you are only going to toss after the holidays.
LikeLike
Linda, everything is beautiful and I especially like your little natural Christmas tree and your boiler turned out so cute. Great job. I decorated a small tree for our family room using all natural elements too. I didn’t want to spend any money and I didn’t want to store a bunch of stuff either. I used bull thistle, fox tail, twigs, and my husband cut ear corn into small rounds and I glued a star anise to each center and hung them from a twine string. It cost us nothing and it turned out so pretty.
LikeLiked by 1 person
I love that you made ornaments out of corn, that’s awesome Becky!
LikeLike
Everything turned out so beautiful! I live in Dallas, where bigger is better, flashy is great – so I love the found and natural decor that you put together. Another winning design by Linda.
LikeLike
Thanks Laura!
LikeLike
Thanks! You have inspired me. I usually buy the spruce tops and get the rest from my yard. I am trying to save money this year so you have totally helped me with some ideas and I am going to skip the spruce tops.
LikeLike
I usually like to buy the spruce tops too, but those things are pricey! So yes, definitely join me in skipping them this year 😉
LikeLike
You have tbe Midas touch without the gold….just beautiful results…good for you! Love all your outdoor goodies, it all looks like it’s straight out of a magazine.
LikeLike
Aw shucks, thanks Terri!
LikeLike
Love this post, Linda! You did an awesome job on your $0 decorating. Very creative. I was all set to wake up early to go shop for discounted greenery, and then I realized how silly that was. We live in Seattle and are surrounded by evergreens. We also get a lot of wind, so I won’t even have to get out my clippers .. just clean up my yard!
Thanks for sharing!
LikeLike
Yep, silly right? Somehow it seems so much easier to just go buy some stuff, but why not just clean up the yard 😉
LikeLike
LINDA! I have to say, this is going on top of what is a very long list of my favorite posts of yours. Simplicity has always been important to me. Reading this about your feelings of inadequacy in what seems like an endless parade of “stuff” (and believe me I am a stuff lover), and then overcoming that thought and really finding creativity amidst all of the excess is such a great message. It’s what our Mother’s and Grandmother’s did. I still remember the beautiful bows my Mom made out of scrap fabric that donned our Christmas tree for years. It doesn’t take money, just a fresh eye (and maybe an awesome neighbor that brings you garbagetreasures) and look at the outcome! I adore how this turned out. That $100 could be put to much better use and you proved to yourself and many others that you don’t need any kind of budget to make your home festive. Kudos, slow-clapping… 😉
LikeLike
Thank you so much for that lovely compliment Meggan!
LikeLike
So, so true. Love this. I very often feel like home decor bloggers are out to outdo each other. But I love reading your blog as I always find inspiration here and what you create is attainable for the average person. And every year when it comes time to decorate for Christmas, I head into our yard with a 5 gallon plastic bucket and start clipping away.
LikeLike
That is my goal, to provide ideas that the average person can pull off!
LikeLike
Genius. It’s much like my mother always decorated. She was great for drying flowers, pressing leaves in the big Sears catalog and making flowers out of kraft paper bags we used to get from the grocery store. I even remember her making poinsettias out of kraft paper and painting them red. The funny things about that is that we lived in Southern California and had a prolific poinsettia bush. But poinsettia stems must be dipped in wax to seal the sap inside or they wilt very fast. At least that was her thought. She did that one year and decided it was too much work — like cutting out, assembling and painting paper poinsettias wasn’t. But I think she considered making them a labor of love. Nothing went to waste and everything had the personal touch.
Do the twigs light up at night? I bet that would make a pretty photo.
LikeLike
What a great story Marilee, I can just picture your mom making those paper poinsettias! Yes, the twigs do light up. I wish I was better at night photography, but I can never seem to capture them in a great photo. But I do love seeing them lit up at night from inside the house, well, I like seeing them from outside too for that matter 🙂
LikeLike
Yeah, night photography is a challenge, but I bet they are pretty. Thanks for sharing with us. You have the BEST ideas.
LikeLike
Thank you Marilee 🙂
LikeLike
Love this Linda! Shopping through the yard, the garage and basement is what I’m going to do as well! You are such a inspiration! Find beauty in everything!
LikeLike
Thanks so much Monique! I bet we can all do a little ‘shopping’ in the garage and basement this year!
LikeLike
So beautiful. Amazing how you don’t need to spend anything and make it look beautiful. Love it all!
LikeLike
Thanks Geniece!
LikeLike
I’m impressed! Looks fabulous.
LikeLike
Thank you!
LikeLike
The lesson to be learned here is to not compare or feel you have to “measure up” to anyone. Just always be yourself!!!!
LikeLike
Totally true! I’ve been trying to learn that for 54 years now, still working on it 😉
LikeLike
They all look really pretty. I’ll have to trim some bushes to fill my sleigh up too.
LikeLike
For sure!
LikeLike
Bravo! Inspiration to use what I already have is always welcome.
LikeLike
I’m always happy to inspire!
LikeLike
Thanks for this post, I follow your blog because you choose to be yourself and inspire us! Tired of clicking around other bloggers ads and pop ups! Please stop comparing your blog to others I love it just the way it is! Great job recycling your greens as you do with your furniture redos. Happy Holidays, Paula.
LikeLike
Thank you Paula! I need to work on my tendency to compare myself to others!
LikeLike
I’m right with you on this..! I’m always watching my budget, always feeling like I can’t possibly create something as beautiful as the bloggers I see. Gosh. This year, I went totally simple, totally free! I ransacked the house and shed and used things I hadn’t used before. And I love it! And it’s free!!
I also put some ice skates on a wreath, inspired by the one you recently posted. Am loving it, even though I didn’t paint the skates.
Thanks for your inspiring ideas and your honesty about your own insecurities…!
LikeLike
Forgot to mark that box again lol!
LikeLiked by 1 person
You’re welcome Jill. I am sure that we all feel insecure sometimes, or like we just can’t measure up to whatever the next person is doing. But I sure did get some satisfaction out of pulling together all of my outdoor decorations without spending a dime,
LikeLike
I always clip my own spruce trees in the yard to get mine. I owe you for all the plants you gave me from your yard so next year I’ll have to bring you some. I tucked those in the back of the planter, added juniper branches I trimmed off the bush in front and then in the front, I used my dried sedum heads that I cut down. It looks so pretty and cost nothing at all. Yours is beautiful too. I might have to grab some of my hydrangea heads I have drying in the garage.
LikeLike
Hey, I’m just glad those plants found a good home, you don’t owe me a thing! I love that you used dried sedum in your winter planters, I should pass that on to my sister. She has some sedum in the garden at her new house that would work well too.
LikeLike
You did a beautiful job! Goes right along with your talent in painting. You are truly amazing!
LikeLike
Aw shucks, thanks Monica!
LikeLike
LOVE! I too, love to forage through my garden to fill up my winter planters. One thing I do it to spray paint the dried hydrangeas…I find that the little blossoms stay on better in MN winters…this year I did some in gold and a few in an aqua blue – gotta say it – the aqua blue ones are so fun in the planters! Love your blog – thank you for all your wonderful inspiration!
LikeLike
That’s such a cool idea. It’s so lovely out today that I am tempted to run out right now and spray paint some hydrangeas! I think I have some aqua spray paint on hand too …
LikeLike
I just discovered your blog about a month ago and I LOVE IT!! I love this post and your honesty. A former favorite blog of mine has been moved way down the ladder because I can’t even scroll it anymore due to all the annoying ads. I love your style of painting…and the before and afters…be still my heart!!
LikeLike
Yippe!! No cost decorating!! Looks awesome!! ❤️
LikeLike