

After getting distracted by other projects, I finally got my Jenny Lind bed painted.
As a reminder, here is the before photo.

I’m going to be honest with you guys, I didn’t do much prep here at all. I tend to slack a bit more when I’m working on items I’m going to keep for myself. If it doesn’t hold up over time, well, no big deal. I can easily re-paint it. If I was going to sell this piece, just to be on the safe side, I would have done my typical prep, a light hand sanding followed by cleaning with TSP substitute. Instead, I just wiped it down with a damp cloth.
I mixed up some of the Homestead House Ochre milk paint (no. 2) that I chose after comparing 3 different shades of yellow (thanks again to Homestead House for providing me with the paint) and once I had it good and mixed, I started painting.
It took 3 coats to get good coverage with the pale yellow over that dark wood. That’s something you should know about milk paint. It is not as opaque as other kinds of paint, and if you’re covering something dark with a pale color it may take a few coats. Or, as I learned this weekend from Miss Mustard Seed, another good option is to paint the piece in a medium shade first, then cover that with the lighter shade. Next time I’ll give that a try.

All of those spindles! Oy vey. I’m not a big fan of painting spindles.

Today’s Qtip: I did get some awesome chipping on this piece and you can chalk that up to the lack of preparation. Had I done more sanding and cleaning with TSP, I wouldn’t have been as likely to get this amount of chipping. Prep is the key to controlling chipping. Check out {this post} for tips on how to get the perfect chippy finish. Or just take your chances like I did with this bed.
I sealed the bed with The Real Milk Paint Co’s Dead Flat which will help halt any further chipping.
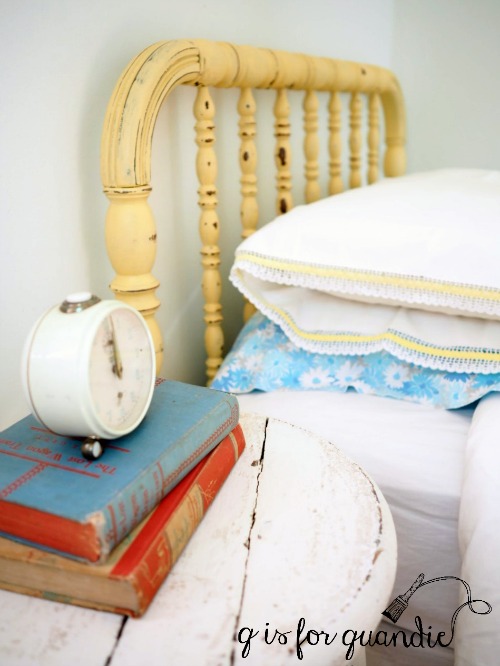
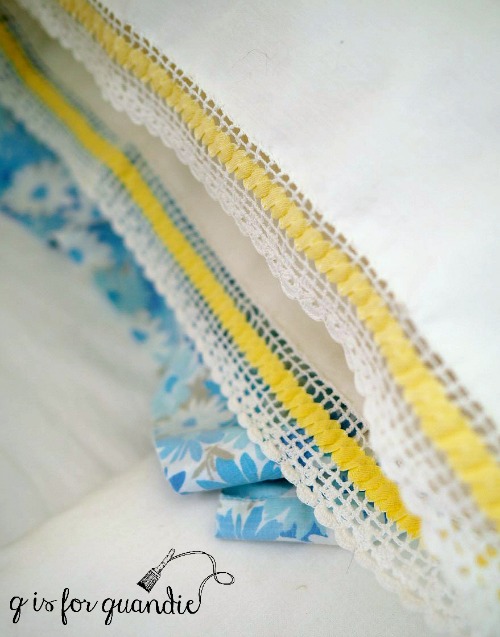
It wasn’t until I was making up the bed that I came across this single vintage pillow case in my linen cupboard. I’d forgotten all about it. Somewhere my sub-conscious must have had this in mind when I chose the yellow for this bed, don’t you think?
I still need a few final touches for my guest room. I’m looking for the perfect something to hang over the bed.

I definitely need a bed skirt, as well as some sort of duvet cover.
But so far the guest room is really coming together. Slowly maybe, but also very inexpensively which is a good thing. I spent $40 on the headboard and another $25 on the frame. I traded my former full size guest bed mattress and box spring for this twin set with my neighbor across the street, nnK. She even included the sheets and duvet, so it was quite the bargain.
I’ll be sure to keep you posted as I continue to make progress in the guest room!

So charming! Such a sweet look with the pretty quilt, too!
LikeLike
I love that word “charming”, that’s exactly what I am going for in this room 🙂
LikeLike
We might need to plan a wine night then I could try out the new guest room 😉
LikeLike
For sure! It’s such a cozy little room, perfect for a sleep over 😉
LikeLike
The yellow has a beautiful cottage feel. I love those pillow cases too.
LikeLike
I still have a weakness for the colorful cottage look!
LikeLike
Love the yellow. Especially that shafe. Im going to check if i have any vintage pillow cases for you too….
LikeLike
Fun! Thanks Terri!
LikeLike
The yellow is perfect for that bed. Lovely!
LikeLike
Thanks Sugar!
LikeLike
Love it! And the combination with all the linen wow.
LikeLike
Thanks Goedele!
LikeLike
Charming for sure, a great example of how it doesn’t take much money to have great impact! I think a window would look really cute and cottagey above the bed, maybe with a little banner across it?
LikeLike
That is a great idea, and coincidentally I just happen to have a couple of windows lying around. Hmmm ….
LikeLike