
I had been keeping an eye on the Craigslist ad for this dresser for at least a month. I thought it had potential, but at $100, it was overpriced (which is why it sat on Craigslist for so long). I finally decided to send the seller a lower offer and they agreed to my price.

When Mr. Q and I arrived to pick it up, the seller told me that she’d had it posted for $200 originally and it never sold. She’d ultimately realized that she really just wanted it out of her garage, so that’s why she lowered the price to $100 and then further agreed to my even lower offer. The implication being that it was worth way more and I was getting a heck of deal.
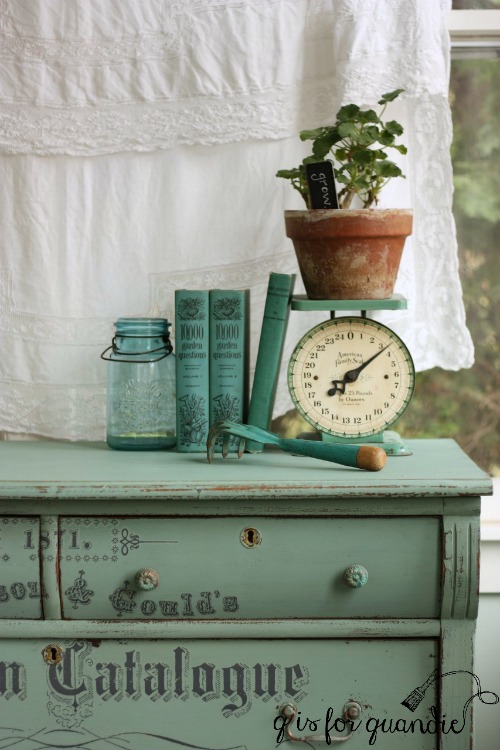
Some people seem to think that anything that is more than 80 years old is a valuable antique. Not true. Condition is everything in the world of antiques, and this dresser was in pretty poor condition. Starting with the fact that at some time in its life someone cut the sides off the top. I assume they needed to fit it into some narrow space and the only way to accomplish that was to trim it down a little. In addition, just check out this alligator-ed finish …
 On top of that, the knobs on the top drawers were completely bent and misshapen, the drawers were hard to open, and there were paint drips all over the top. And did I mention that it was positively filthy and obviously had been in that garage for quite some time?
But I bought it anyway. I could see it still had potential, just not $100 worth of potential and certainly not $200 worth!
To get started, I sanded it down just slightly and then cleaned it with vinegar water. Next I sanded down the sides of the drawers (where they sit on the glides) and then rubbed a block of canning wax over them so they would glide more easily. Then I once again used my ‘perfect chipping method‘ and added some Homestead House Salad Bowl Finish (you can also use Miss Mustard 100% beeswax) in spots that I wanted to chip.
Choosing to go with milk paint on this dresser was a no-brainer. Milk paint and alligator are the perfect pair. The tricky part was deciding on a color. Since I’d gotten several comments recently from readers who love seeing more color and are bored with white, I thought it would be fun to go more colorful with this one. I wasn’t in the mood for any of the straight up milk paint colors I had on hand though, so I decided to create my own.

Now I’ll just go ahead and apologize right now to those of you who might want to try and recreate this color. Not that you can’t do it, but it will require three different colors and two different brands of milk paint because this color is a mix of equals parts Homestead House Loyalist, Homestead House Upper Canada Green and Miss Mustard Seed Kitchen Scale.
I think I’ll call this color Blue Alligator.

And see what I mean about milk paint and alligator? Such an awesome effect.
I’m not sure any of my photos do justice to Blue Alligator, and I don’t think I can adequately describe how it differs from straight up Kitchen Scale. It has a little more green than Kitchen Scale (thanks to the Upper Canada Green), and it’s a little more muted (thanks to the Loyalist), and it’s a little bit lighter.
And I have to tell you, I loved this color so much I painted two more things with it. A chalkboard and another piece that you’ll be seeing in the next week or two.
Painting this piece ended up being the easy part. Two quick coats and it was done.
Next came the exciting part. I pulled out another of my Iron Orchid Designs transfers. This is the larger version of the same design I used on my green window last week. In fact, this transfer was actually too large to use on this dresser ‘as is’, so I cut it apart and just used the sections that worked. If you look closely you’ll see that my dresser is a mishmash of various pieces of it. I did each layer (top, middle, bottom) of drawers separately.
![]()
According to the Iron Orchid Designs YouTube videos, you can put any typical top coat over their transfers. So I went ahead and waxed the dresser with Homestead House furniture wax next.
Finally, I found some knobs in my stash for the top two drawers. They looked a bit too new next to the original drawer pulls though, so I decided to try a new technique on them and added a copper patina. I’m going to post about that process in more detail later this week, so be sure to check back for that.

So now, what do you think? Is this thing just gorgeous or what?

OMG! Right?
Wouldn’t this dresser be amazing in a potting shed?
I could also see it working perfectly as a small buffet in a dining room.
It actually looks pretty much perfect right in that spot on my front three season porch.

But I’m not planning to keep it.
Of course, if it doesn’t sell … well, let’s just say I won’t be crying in my coffee.

For now though, this dresser is for sale, so if you are local and need a gorgeous dresser be sure to check out my ‘available for local sale’ tab.

Over the top F-a-b-u-l-o-u-s!!! If I were not 1100 miles away I would buy it. Which is saying a bunch since the color goes with nothing in my home. However I could totally build a room around it. Just loving these new rubs ons. Your new custom color “alligator blue” is a definitely keeper. And unlike the other yellow or green pieces that have taken a bit longer to move I predict this baby will be looking like Sheldon doing Flash. If in fact it’s not sold before my comment is posted. ❤️
LikeLike
It would be fun to build a room around this piece, wouldn’t it? I hope your prediction comes true Victoria 🙂
LikeLike
Wow! That transfer looks amazing on this dresser. Yes, it does scream potting shed, sunroom, garden room. Really pretty. I wonder, do your customers ever send you pictures of how they use your pieces? Just curious.
LikeLike
No, for the most part my customers do not send me photos. Several of them have said they would over the years, but no one ever actually follows through. It would be fun to see.
LikeLike
Oh that sure is lovely! I think it is one of my favorites! Just WOW! It would be cool to see how your buyers are using their treasures you create!
Blessings
LikeLike
Thanks Shelly! It’s definitely one of my favorites too 😉
LikeLike
One of my favorites! I need to order some of the rub ons. And of course I want to recreation that color. Fab!
LikeLike
The color is gorgeous, I hope you give it a try … along with the rub-on’s which are seriously addicting.
LikeLike
Love Love Love it! Perfect for Spring…in a sunroom. You are Inspiring!
LikeLike
It is definitely perfect for Spring! Thanks Regina!
LikeLike
I’m in love with this piece! You have such great taste and your talent is over the top! Thanks for sharing!
LikeLike
You are too kind 🙂 Thanks so much!
LikeLike
You mixed up a stunning color, Linda! And the transfer is just perfect. I would be tempted to build a potting shed just so I could use that dresser! LOL Thanks for sharing.
LikeLike
LOL, I can’t think of a better reason to build a potting shed 😉
LikeLike
Oh how pretty! I love that color! Do you have any advice for removing “mouse smell” from old furniture? I purchased a dresser at a barn sale that has a horrible smell in the drawers. It will be beautiful after I deal with the smell! I have tried bleach, vinegar, sunlight, tea bags, any advice? Thank you for any help you can give me!
LikeLike
Crumpled up newspaper and charcoal might work. Fill the drawers and keep it closed for a few days or longer….
LikeLike
Thank you Terri! I will try that!
LikeLike
I’m actually going to be posting about this next week. I have tried all of the remedies you’ve mentioned, plus a few more. Let’s face it, mouse pee is the worst. I have had to resort to replacing drawer bottoms (if they are saturated with the mouse droppings) in worst case scenarios. Short of that, my next solution is to paint them inside and out. I just did this using Fusion paint and it worked like a charm.
LikeLike
Love it. The color is gorgeous.
LikeLike
Thanks Nora!
LikeLike
Beautiful color, fantastic details. I love, love, love it. Your staging is flawless, too, I might add. Thanks for some Monday morning inspiration.
LikeLike
Thank you so much Laura!
LikeLike
I love it Linda!!!!
LikeLike
Thanks Lisa!
LikeLike
Yep, it would be perfect in a potting shed or a sun room. Very nice. I like the transfers on it.
LikeLike
Those transfers are da bomb 🙂
LikeLike
Absolutely stunning 💚💚💚
LikeLike
Thanks Sada!
LikeLike
OH it is wonderful! Beautiful color and the transfers take it to another level! Beautiful work!
LikeLike
Yes, I am loving the transfers. They really do take it to another level.
LikeLike
Love the colour and the transfer! Good negotiating skills too.
LikeLike
I’m not generally one who does a lot of negotiating on Craigslist. Most of the time I just go after pieces that are listed at a price I want to pay. But once in a blue moon (maybe an alligator blue moon 😉 ) I will make an offer on something that is listed for more than I think it’s worth. In which case, I usually wait until it has been sitting on Craigslist for a while with no takers.
LikeLike
I’m interested in your vinegar water cleanser…what’s the ratio of water to vinegar, and how do you apply it? Spray bottle and wipe? Thanks! The dresser came out beautiful, by the way!
LikeLike
Nothing so fancy as all of that. Basically I splash about 1/2 a cup of vinegar into my bucket, then add about a gallon or so of hot water. Then I just use a rag dipped in the bucket to scrub down the piece. I’ve read pros and cons about using vinegar as a cleaning agent. One article I read said that it really doesn’t work for cleaning dirty surfaces any better than plain water. Maybe that’s true, but I sure end up with a bucket of dirty water afterwards! Vinegar definitely is a good disinfectant though, so I feel like I’m covering all my bases with the vinegar water and it’s not as hard on my hands as the TSP Substitute that I used to use all the time.
LikeLike
Just lovely, amazing transformation! Wish I had your ability to visualize a piece with some paint and transfers.
Thanks for sharing, Paula
LikeLike
You’re welcome Paula! Thanks for the compliment 🙂
LikeLike
Such a lovely, relaxing color; it highlights the graceful lines and curves of the dresser. This was a battle-scarred charmer in disguise. Great find: great transformation. Love the precise and more detailed look of the transfers. Fun to find something new to play with!
LikeLike
I’m always so impressed with how you manage to find the exact right words to describe something Kim. ‘Precise and more detailed’ is exactly the right way to explain how these transfers are different from stencils or gel medium transfers. Love that!
LikeLiked by 1 person
Beautiful! I love the color. Funny. You talked me into trying some of the transfers. I just bought that one. I have a dresser that I am painting Lucketts. I tried one on another dresser and loved it. Thank you for sharing.
LikeLike
That’s awesome! You’re welcome 🙂
LikeLike
Incredible! … makes me want a garden room just to have this as the centerpiece.
LikeLike
Everyone should have a garden room, don’t you think?
LikeLike
Absolutely beautiful!!!! I wish I had a sweet potting shed….thanks for the wonderful inspiration!
LikeLike
You’re welcome Kristin.
LikeLike
I adore this piece! I’ve looked closely at the photos and have a question. Does the transfer leave a sheen around the letters/ornaments? I don’t quite know how to say what I mean…. is there kind of a plasticky halo that goes beyond the black image? I’m trying to get a better idea of these transfers. Or I may have just hit my head while being dragged off a plane and halos are simply something I’ll have to live with now. 🙂
LikeLike
BTW I’m not complaining. The plane could have been in midair at the time.
LikeLike
Yes, you are correct about the halo. It’s pretty much invisible looking straight on, but from an angle with the light hitting it ‘just so’, you can see it. There is a difference between the sheen of the transfer and the sheen of the milk paint. In some of my photos it almost appears as though there is a white shadow around each letter, but it isn’t white, it’s clear. That may disappear more if you add a top coat like Miss Mustard Seed’s Tough Coat, or a matte finish poly over the whole piece. I haven’t tried doing that yet, but I have plans to try it soon.
LikeLike
Hi I’m new to milk paint and I don’t see a lot of chipping going on here even though you waxed in spots. Is that what you wanted and did you distress in the spots where you waxed too. Love the whole thing to death by the way.
LikeLike
Thanks Melissa! And you’ve asked a great question. Although the amount of chipping that you get with milk paint can be unpredictable, there are things that you can do to try and control it. After Jennylyn Pringle shared her secret to perfect chipping with me (and I posted about that here), I have been getting really good results with her method. Here’s the trick; you have to properly prep your piece as if you didn’t want any chipping. That means you need to sand it lightly and clean it well before starting to paint. Especially if it has a shiny surface, or has any oily residue (like furniture polish for instance). Once you’ve done that, you rub just a very light coat of the beeswax on any areas that you want to chip. With this dresser I only did that around the edges of the drawers. I have a little confession to make now. I meant to add wax around the edges on the body of the dresser too, but I forgot! So, if you look closely at the dresser (especially that last photo), you can see that I did get some great chipping just around the edges of the drawers and really not much anywhere else. It is a little hard to see in my photos. Aside from that, I did sand the entire dresser after painting to produce additional distressing. I really prefer a controlled sort of chipping like this rather than random out of control chipping (which I have experienced more than once with milk paint). A little extra attention paid to prepping your piece will save you from that frustrating moment when you realize that all of your paint is chipping off! And of course, if you wanted more chipping than what I got on this dresser, you could just apply beeswax to more of the surface area before painting. If you give this method a try, be sure to let me know how it goes for you.
LikeLike
Hello ! Your work is all amazing. Can i ask you how you did the transfers? Thanks. Vera.
LikeLike
Thanks Vera! I gave a little more detail on applying a furniture transfer in the post on my Specimens cupboard (here), but if you really want a good tutorial check out this Iron Orchid Designs video on YouTube.
LikeLike
Absolutelty love this! I’ve never used milk paint, but I think I’ll have to give it a try! Beautiful!
LikeLike