
Ahoy matey’s, today I have a pirate desk to share with you.

You are probably wondering what makes it a pirate desk, right? Well, it had a peg leg when I bought it. You can’t see it in the ‘before’ photo unfortunately, so you’ll just have to trust me on this one. See those curvy feet (well, as much as isn’t covered by grass)? Well, the back right one was missing and the previous owner of the desk just nailed on a chunk of 2 x 4 instead. That explains why the price on this desk was ridiculously low. Well, that and the numerous spots where veneer was chipping off, and maybe all of the dings too and that one mismatched drawer pull. Yep, this baby had a few flaws.
But it was especially unfortunate about the foot because otherwise the back of this desk is finished, meaning it could be floated in a room with the back facing out. But certainly not with a 2 x 4 foot.
So after I brought this one home I called Ken to come over for consultation (which involves him going out his back door and crossing over though my backyard to my workshop). He looked seriously skeptical as I stood there saying I was quite confident that he could come up with a fix. Ken may not have faith in his abilities, but I do!
I told him it didn’t have to be perfect, it just had to blend a little bit. He hemmed and he hawed, and then he studied the other feet, and then he went home and thought about it for a while. Then when I came home from work a few days later he had done this.

Ken, being a bit of a perfectionist, was not entirely happy with it but I thought it was amazing! I knew once I got it painted you wouldn’t even notice that it was different from the other feet. It certainly beats a 2 x 4!
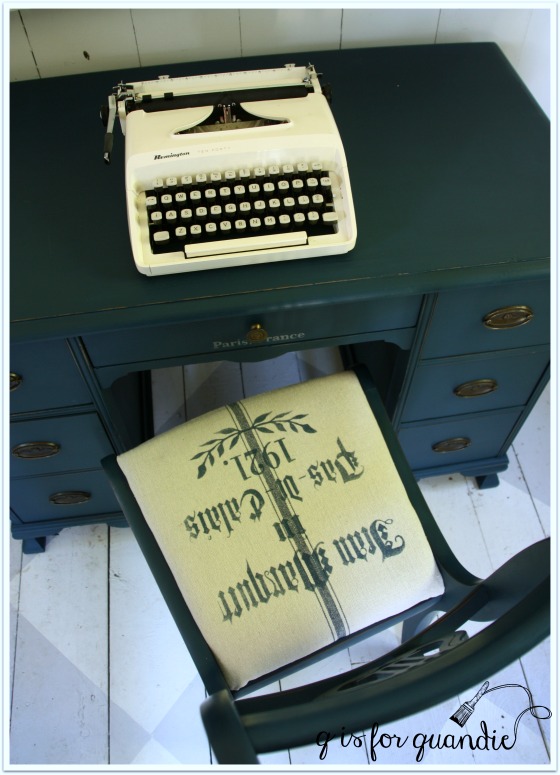
I decided to go with Little Billy Goat’s Prizewinner on this desk. I really love this blue!

To deepen the blue a bit, I used Little Billy Goat’s new black wax as a finish. I had only used the black wax on top of black before, so I wasn’t sure how it would work over a color, but it worked perfectly over the Prizewinner.
Did you notice in the ‘before’ photo that there was one mismatched drawer pull on the lower left hand drawer? I find it odd that the previous owner chose to put the mismatch on that drawer rather than the upper middle. Duh. That fix is a no brainer. I was able to use all of the original pulls on the side drawers and I just added a coordinating knob from my stash to the middle drawer.

I also added a little Paris, France stencil just to give the desk a little extra personality.
Remember I posted a week or two ago about finding some chairs to use with desks? Then my sister-in-law brought over this chair.

Seemed like kismet, so I painted it up to match the desk and I added a pretty faux grain sack seat.

But guess what? It doesn’t quite fit under the desk. Argh. However, not all desk chairs have to be tucked in, right? For example, my own desk chair does not fit under my desk because it has arms.
By the way, in case you’re wondering how that replacement foot ended up blending in once painted, check it out.

Be honest, if I hadn’t told you about it would you have even noticed? Can you even tell which one it is?
I did go ahead and paint the back because with Ken’s faux foot, I think this desk would be perfectly fine facing out. This way whomever purchases the desk will have options.
I actually did two different photo shoots. I started out in the photo cottage, but I wasn’t super happy with any of those photos.

So then I pulled it out into the driveway where I staged it simply with a cream colored vintage typewriter and some Reader’s Digest books.

I picked up the books at a garage sale because the colors were so pretty. I knew they would come in handy for furniture photos.

I almost forgot. I have one more thing to take care of before this desk is available. I need to line that middle drawer. I have to admit though, I’m a little drawn to the graffiti art that I’ll be covering up.

How about you?

I love that blue. Mr. Neighbor did an awesome job on the foot! I have scribbles on an old desk of mine, which was my own graffiti, but not everyone would appreciate it, I’m sure. I’d put in pretty paper to cover it, and new owners can decide what they like.
LikeLike
I was thinking I’d line it with loose paper that can be left in or taken out.
LikeLike
Leave the scribbles.
LikeLike
I’m happy to hear that others appreciate that ‘desk drawer graffiti’ as much as I do!
LikeLike
I love that color too! The foot does match perfectly, can’t tell Ken was just trying to come up with something close. Like the little Paris stencil added too.
LikeLike
Thanks sis!
LikeLike
Smashing project! The scribbles are fun but not everyone is going to appreciate them.
Is it possible to paint the interior of the drawer? Ken should get two bottles for this one. Would never have noticed the leg. Love the addition of a chair. The grain sack is perfect. You really do a fabulous job on those grain sacks. This is one of my favorites Q – the fact that you can float it is nice. And I love the color too!
LikeLike
So true about the scribbles. They are probably more endearing if you actually know the kid who did them, otherwise probably not so much.
LikeLike
Very nice! Love the color. You had mentioned there were a few spots where the veneer was chipping off. Sure can’t see that in the finished product. How’d you deal with that on this piece? Do you have any old posts discussing veneer issues? Thanking you in advance for sharing your wisdom and experience. You know you are my sunshine. 🌞
LikeLike
Woo hoo, a comment from my no. 1 protege’! I handle chipping veneer in a several different ways. Sometimes I just embrace it like I did with the book page dresser. Sometimes I trim off the bad spots and use wood filler to smooth over the transition like I did on the seriously studious desk. Sometimes I remove it completely and paint over whatever is underneath like I did on the cooking with wine buffet. I would say that in general most of my pieces have some kind of veneer issue, after all that is what makes them good candidates for a paint job. My basic fix is to first re-glue any loose veneer. My glue syringe (just like these from Amazon) is one of my most often used tools. It helps get the glue under the lifting veneer. I then place a paint stir stick wrapped in wax paper over the freshly glued veneer and clamp it for a few hours (the wax paper keeps the stick from becoming glued to the veneer). Then, if I want a smooth surface, I spread wood filler over the area and even it out with a scraper. Once dry, I sand it smooth. Maybe I should write a post about this process, huh?
LikeLike
A post expanding on what you described above would be very useful, not just for this grasshopper (me), but for many others as well.
LikeLike
Ah yes, young grasshopper 😉 Be patient and you will be rewarded.
LikeLike
Great desk and color and Ken is amazing!
LikeLike
Ken is amazing, isn’t he?!
LikeLike
Best color yet! Love the dwsk…Ken is a God-send for sure!And I know he loves helping you, so thats the win/win. Good work with the matching chair too.
LikeLike
I agree, win/win!
LikeLike
He did a great job with the new leg! It is a beautiful desk and chair…and I love the graffiti, too!
LikeLike
It’s fun to find that so many are appreciating the graffiti!
LikeLike
I think it is immaterial whether or not you know the graffiti artist. True graffiti should be pretty meaningless to anyone else, yet intentionally graffiti would be obvious. Can’t say why, it just would be. I think if it is left intentionally, it becomes more valuable as an artifact.
We have some old graffiti in the jail cells at the Historic Courthouse and they are now considered historical relics. I know you’ve seen the graffiti in Pompeii, this is the same idea, it appreciates with age.
LikeLike
It might be a while before this desk reaches Pompeii status 😉
LikeLike
Lol! The entertainment here is priceless!
LikeLike
The new foot looks perfect to me! Love that blue too. So glad you were able to save this desk 🙂
LikeLike
Me too! I have to give Ken most of the credit for saving this one. He did the real saving, and I just made it pretty afterwards 😉
LikeLike
This desk is lovely, from the color to it’s new foot to the way it is styled! Love it, wish I had a Ken in my life, great job
Thanks for sharing, Paula
LikeLike
I think Ken enjoys these little challenges, and he especially loves it when I pass on all of the compliments!
LikeLike
Ken saves the day again! You are so lucky to have such a great neighbor!
The desk looks wonderful!
Blessings
LikeLike
Yes, I definitely am lucky! Thanks Shelly!
LikeLike
I love this desk! That color of paint is perfect. Where can I purchase some? Also, when you line your drawers, do you adhere them with something? As always, I enjoy your posts so much. You are a very talented lady!
LikeLike
If you are local (are you?), you can find the paint at Reclaiming Beautiful in Stillwater. If not, try using the ‘Find A Retailer’ option on the Little Billy Goat website {here}. If there isn’t a retailer near you, you can order online {here}.
As for lining drawers, when I use a loose flat piece of paper I usually just let it float in the drawer. However, I see several great ‘furniture artists’ out there who use wrapping paper, or paper that comes on a roll from places like Spoonflower, and like you, I’d like to know if they use something to adhere that paper in their drawers. No one seems to mention it, but it always looks so flat and smooth. If you ever find out the answer to that, let me know too!
LikeLike
Thank you for the info. I am not local. I am in Washington state. I will take your advice to find a local retailer. If I find anything out on the paper I will share that with you. Thank you so much.
LikeLike