
I just added a new category to my blog. By the way, did you know that q is for quandie is categorized? If you are reading this blog on the website (as opposed to on Facebook, or via email if you are a follower) just look over to the right. Just under where it says “stuff.” you can bring up a pull-down menu of my categories. Want to see just my posts about travel? or gardening? or my house? Just click on the appropriate category and posts about that subject will come up.
So, like I said, I just added a new category called ‘how to’. At this point some of you might be thinking “well duh, there is a ton of ‘how to’ info on this blog already!” and that is true. I just decided at this point that I might as well organize that info a little so you have an easy way to refer back to these posts.

You might think that painting stripes on furniture is fairly easy. And you wouldn’t be totally wrong. It is easy, if you keep a few simple tips in mind. I’ve done a few striped pieces in my day, and as is par for the course, I learned by making mistakes.
One of my earliest striped pieces was this one.
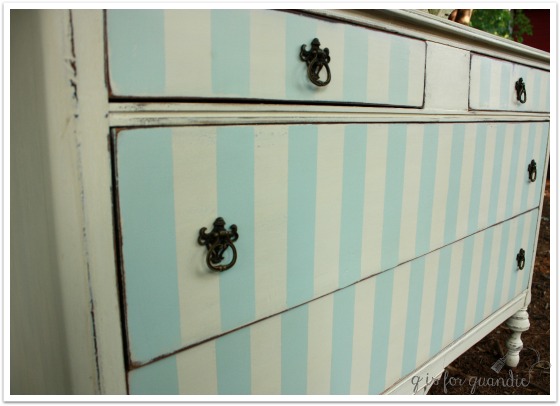
If you’ll be attempting to stripe a piece like this, you want to make sure you account for that area between the two upper drawers. The first time I painted this one, I had the drawers out of the dresser. I wasn’t even thinking about that space. So yes, the stripes on the upper right drawer did not line up! Learned that one the hard way.
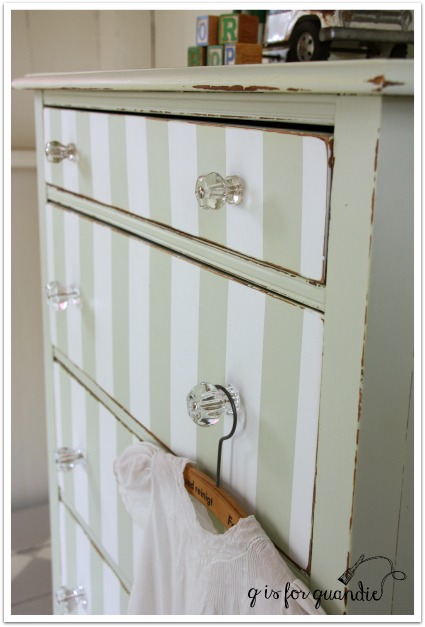
Once I got to this next one, I had that lesson down pat.
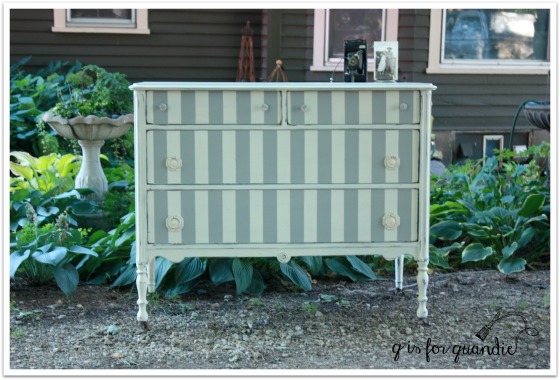
When you have a desk with a center drawer, you want to be sure to center your stripes on that middle drawer and then work your way outward.

Can you tell that I’m a fan of striped furniture?

So, let’s get to those tips.
To begin with paint your entire piece in your base color. When choosing which paint to use, keep in mind that you’ll be using tape for your stripes. If you use milk paint, chances are you will see exactly where your tape was when you pull it off. Yep, learned that the hard way as well. It’s not a good look, and for that reason I use either chalk paint or Fusion paint for stripe jobs.
Again because of the tape, I like to give my base coat at least 24 hours to dry well before continuing.
Next, gather your supplies. You’ll need painting tape, a measuring tape, your stripe paint color, and coffee (that last one might not apply to everyone, but it’s a must for me). You’ll also need a pencil, which I neglected to include in my photo.
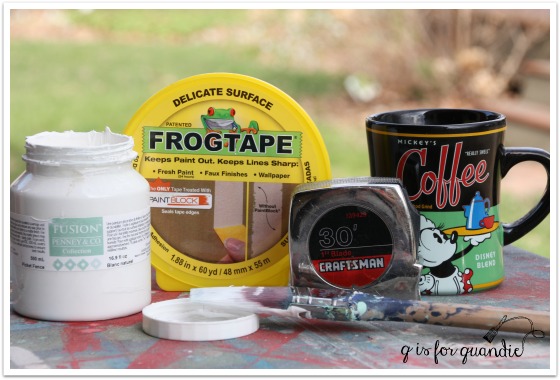 I like the delicate surface frog tape for taping over fresh paint (see, it even says that on the label!).
First find the middle of your drawer. Always, always, always start in the middle and center your first stripe then work out to each side from there.
With the little speckled frog dresser my job was made exceedingly easy because the drawers were exactly 24″ wide. Putting the middle at precisely 12″. Easy, peasy.
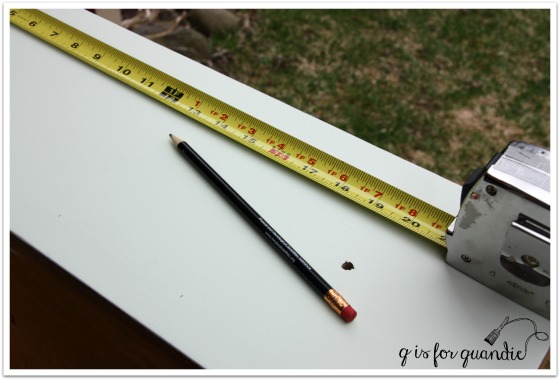 Now, here’s a little secret. The wide frog tape is 1.88″ wide (why, oh why, did they do that?), so I put 2.12″ between each stripe. Why? Because I can’t wrap my head around the math involved in 1.88″ wide and what that equals on the measuring tape (what would that even be? can any of you tell me?). Instead I make my marks every 4″. And I have found that visually the stripes do not look like they are different widths.
So, what does that mean? It means I find the middle, in this case at 12″. Then I measure 1″ to the left of center (because my center stripe will be my base color and will be 2″ wide) and make a mark. In this case, that was at 11″. I make a faint pencil mark near the top of the drawer and another near the bottom of the drawer. Then I use those two marks and line up the right side of my tape with them.
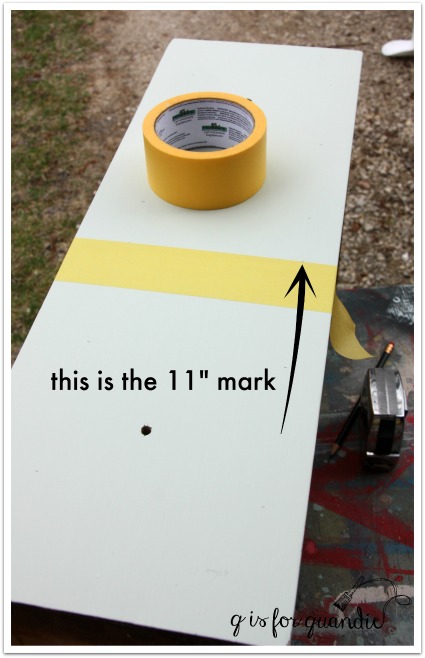
Important tip, don’t measure your next line from the tape. Remember, it’s only 1.88″ wide and will throw off your measurements. Work your way left from the center making marks at every 4″from your initial mark. On my drawer that meant I had the initial mark at 11″, then marks at 7″ and 3″ from the left side of the drawer. Now, for the other side, remember your center strip is 2″ wide, 1″ to each side of center. From there make marks every 4″ (in my case at 13″, 17″ and 21″). You’ll now be lining up the left side of your tape with the marks. This sounds a little more complicated than it really is. And once you have your measurements, you can use them on every drawer if you are doing a piece like this one with stacked drawers.
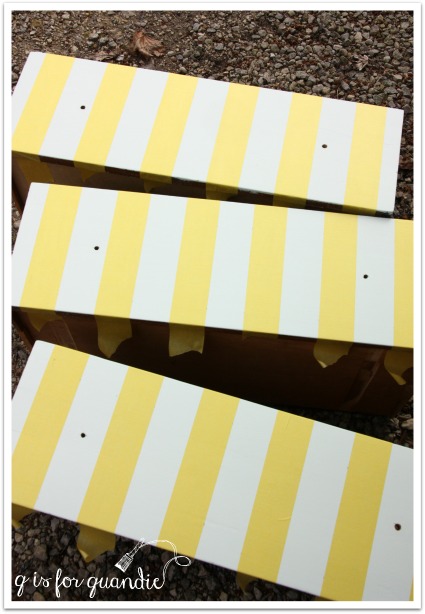
Once your tape is all in place, be sure to press firmly along all of the edges to prevent your paint from bleeding under the tape. I have heard that first painting another coat of your base coat to “seal” the edges works great for this as well, but I’ve never tried that. I find that the Frog tape does a pretty good job without adding that extra step.
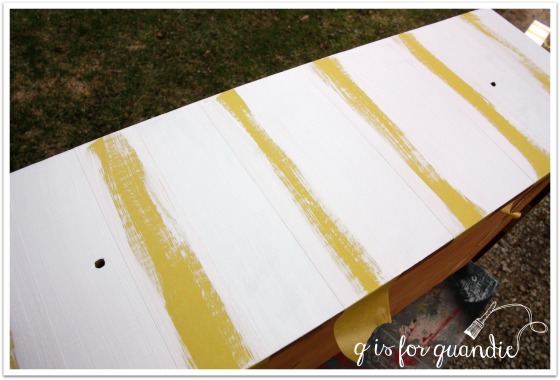
Normally I would paint a drawer with a horizontal motion, but you don’t want to do that here. Use brush strokes that are parallel to your tape to avoid pushing paint under your tape. I used two quick coats of Fusion’s Picket Fence on my project allowing about an hour of drying time between coats.
I remove the tape immediately after finishing the second coat, before the paint is dry. I like to get that tape back off as soon as I can to avoid damaging the base coat.
And voila, striped drawers!
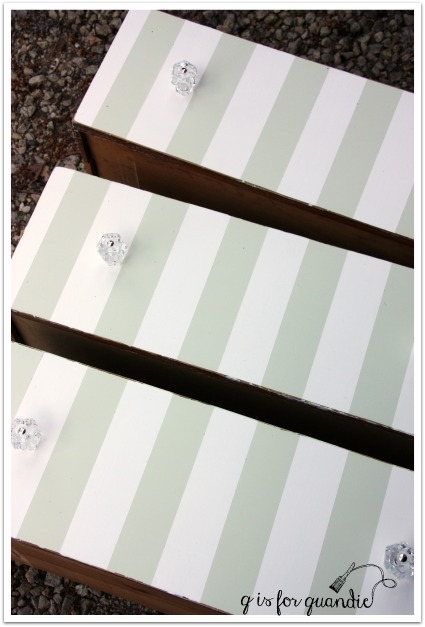
Load them back into your dresser, and you have something like this.
So, have I inspired any of you to try some stripes?

Oh my! Thank you for this detailed post! I’d love to try this someday…. But it kinda overwhelms me! I’ll be saving this post and referring back if I ever get the nerve … And the right piece to stripe!
LikeLike
I think it’s really easier than it sounds. Hope you give it a try!
LikeLike
As some of you may have suspected, mostly what a cup of coffee does around Q is grow cold while she works away. I imagine it is mostly a psychological need. That poor little cup of coffee with the forlorn hope that somebody will drink it that the life of the coffee beans mayn’t be sacrificed in vain! I can see the lone bereft tear carefully plying it’s course down the sun weathered cheek of Juan Valdez.
LikeLike
“Lone bereft tear”, you crack me up Mike 🙂
LikeLike
Me too!
LikeLike
That poor Juan Valdez. I do let a lot of coffee go cold when I’m focused on something.
LikeLike
Thank God Seth did all the measuring and math when we did the buffalo check wall in the boys room, that’s all I have to say. 😉 Very well written tutorial!
LikeLike
That wall is so fabulous! That would have made an awesome blog post 😉
LikeLike
Why oh why do they sell tape 1.88″ ? If there is a rational answer I’d truly like to hear it. You did a very thorough job explaining this technique. The thought of doing it on all those drawers is pretty overwhelming as Hazel Mae stated. I have to add the end results however would be totally worth.
LikeLike
Once you have the measurements down straight, it’s really much easier than it sounds. But that darn tape, why couldn’t it be exactly 2″ wide?
LikeLike
Stripes are my absolute fave pattern! Awesome post Quandie! I admit I’m not really a measurer… more of an eyeballer… hate the math! I will try using your instructions next time though, thank you for doing all the work for me! lol! I hope you have a great day!
Smiles!
Terry
LikeLike
In general I’m kind of an eyeballer too (why does that sound kinda dirty?), but stripes can go off kilter quickly. And when you have stacked drawers like this, you want to make sure they all line up precisely or your eye will go right to any wonky spots.
LikeLike
Sooooo true! …. and , YIKES!… that did sound a little creepyish ! lol! Good thing we speak the same language ;)!
Have a great day!
LikeLike
LOL, you too Terry!
LikeLike
Love love love love the stripes!
LikeLike
You’ve done a few stripes yourself, haven’t you Darrielle? Have I inspired you to get out the tape and stripe something again?
LikeLike
Awesome post! Can’t wait to paint and stripe a desk and chest! Your tutorial is a great guide! Thanks!!!
LikeLike
Let me know how they turn out Linda!
LikeLike
Thanks for this clear tutorial! I can’t wait to paint a dresser for my guest room!
LikeLike
My grandpa Bud used to work in the 3M plant supervising tape packing tables in the 30s. I’ll ask him why masking tape is the width it is. I suspect it has to do with the width of the machine that makes the tape in the first place. If the spindle were 16′ wide and the tape was made in rolls that allowed 2″ of clearance on either side, then 100 rolls at 1.88″ could be cut from that single piece.
Just supposing.
LikeLike
And now that I look at the table in the picture I see that it isn’t a 3M product and that it is metric. European processing is completely different. I withdraw my suggestion.
LikeLike
You’re probably right though, the size probably has more to do with the manufacturing process than the needs of the end user.
LikeLike