

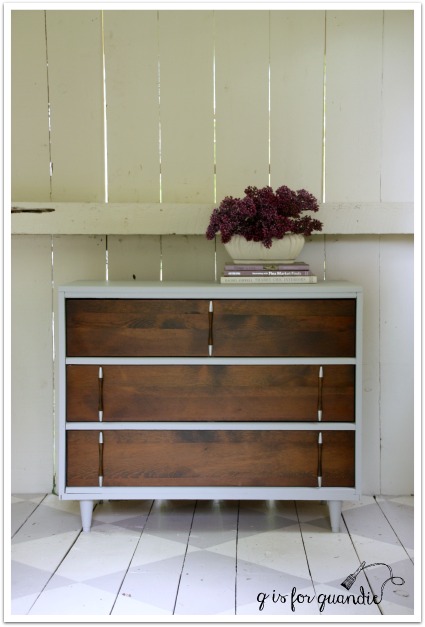
A while back my craigslist spotter, nnK, spotted this little mid-century dresser for me. It wasn’t far away, and I was in the mood for a little mid-mod so Mr. Q and I went and picked it up.

I wanted to paint the body of the dresser, but leave the drawer fronts unpainted. However, in addition to being a bit worn, I wasn’t particularly fond of the ‘pieced together strips of wood’ look on the drawer fronts. So I decided to try using gel stain to solve both of these problems. First of all, gel stain can be used over an existing finish, so it wouldn’t require a lot of work to spruce these up and make them look new again. Second of all, gel stain is not quite as transparent as traditional stain, so it helps blend different grains of wood.
Before applying the stain, I sanded the drawers fairly well with my palm sander. Then, after wiping them down with TSP substitute, I applied Varathane’s Dark Walnut gel stain with an old t-shirt. I let that dry overnight and the next day I added two coats of a matte poly finish.
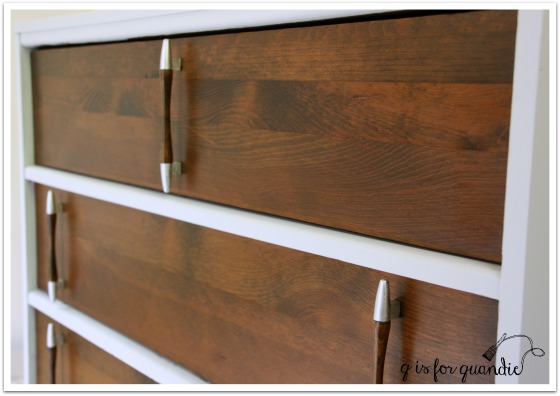
I definitely achieved my first goal of sprucing them up, but not so sure I minimized the appearance of those strips. Nonetheless, the drawers are definitely much improved!
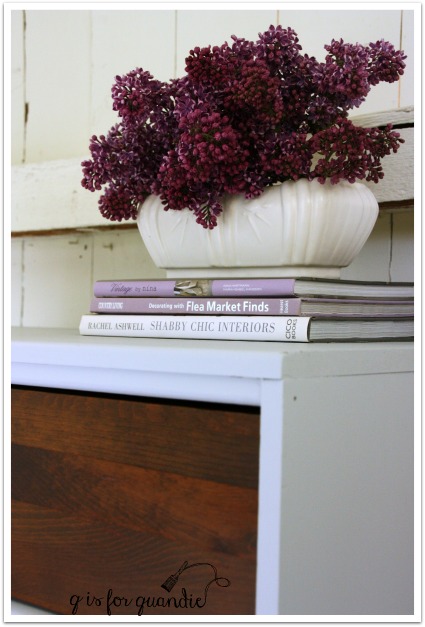
I painted the rest of the dresser in Fusion’s Sterling, which is a pale silvery grey.
Once I had the Sterling painted, I realized that the original gold brass on the drawer pulls wasn’t going to work. I solved that by adding some Silver Leaf rub ‘n buff to them. I also gave the wooden centers a swipe with the gel stain and another swipe with the poly. I didn’t sand them, and I wasn’t terribly particular about the application of the products, but it was just enough to give them a fresh look and to blend their color with the drawer fronts.

These were all really simple techniques that gave this dresser a fresh new look in no time at all.
What do you think?
Anyone else in the mood for a little mid-mod?

Congratulations Quandy on your feature by fusion mineral paint on Facebook! 🙂 Way to rock the fusion paint! The feature was obviously well deserved! This piece looks lovely! 🙂 I hope you have a wonderful day Quandie!
Smiles!
Terry
LikeLike
Hey, thanks for the heads up on that Terry! I didn’t even know. The people at Fusion are extremely supportive of my work and are just all around awesome!
LikeLike
It’s well deserved Quandie! Have a great weekend!
Smiles!
LikeLike
Love to see mod pieces painted mixed with their rich wood. A lot of people think it’s some major faux pas to paint a mcm piece, but some times it gets a more coveted look when done just right, especially the way you do it.
LikeLike
Yes, some people do gasp in horror when I paint a mcm piece (I’m talking to you nnK), but I’m with you LaLa, I like a mix. This one was not made with the prettiest of wood either, so I think it was fair game for a paint job!
LikeLike
I LOVE it!!!
LikeLike
Woo hoo! A comment from my bestie 😉
LikeLike
It is beautiful. Great job.
LikeLike
Thanks Patricia!
LikeLike
Really like what you did to this mod dresser. The wood does look better and matching the silver on the handles with the light silver paint color was a nice touch.
LikeLike
Thanks Skip! Yep, those handles had to go silver.
LikeLike
I love what you did with that piece! Great hardware.
LikeLike
Thanks Teri. Oftentimes I feel like it’s the hardware that makes a mid-mod piece special, which was definitely the case here.
LikeLike
Love this! I’m a huge fan of gel stain and fusion is the perfect paint for this project!
LikeLike
I was always afraid of staining before. I felt like it was difficult to keep it even. But the gel stain is so easy to use! Gotta love it!
LikeLike
The hardware does make this piece. Definitely a good call call to silver leaf those handles. Nice update.
I just suggested the gel stain to client who needs to either paint or stain her honey oak kitchen cabinets. An entire kitchen would scare me personally. I would be concerned about the stain going on evenly. But it is a wow on this piece.
LikeLike
Well, an entire kitchen would scare me too 😉 But I have to say, I’ve never had a problem getting the gel stain to look even. It’s pretty easy to work with in small batches.
LikeLike
I love how this turned out, Linda! And I’m glad to see how the handles turned out, too…I wanted to try that product on some hinges. Thanks for sharing!
LikeLike
Here’s a tip for you on using the rub ‘n buff. You have to let it cure after you put it on before you can get on with the ‘buffing’ part. The first time I used it, I applied and then proceeded to take it all right back off again in an attempt to buff. Now I apply and then wait a day or so before any further handling.
LikeLike
Do you have any tips on using rub and buff? I still haven’t been able to get a good finish unless I paint them first.
LikeLike
I usually wash my hardware first with dishwashing liquid to remove any oily residues and dirt. One fully dry, I just apply the rub ‘n buff with my finger. You do sort of have to get a feel for this step. If you over-work the r ‘n b it will start coming back off again. Use enough product to get good coverage with a couple of swipes, but not so much that it’s caked on. Next let it dry fully before handling it further. The first time I used the rub ‘n buff I thought it was awful and I couldn’t understand why anyone used it. I applied it, and then tried to buff it right away and most of it came right back off on my cloth. I was going by the info I saw all over the web that said it dries really quickly. I have found that it works best for me to apply it and then wait about a day to buff and/or handle it. I’ve also had my r ‘n b go bad. The cap was cracked and it dried out, at which point it did not work well. It should be sort of creamy, not dry and really waxy. Hope this info helps!
LikeLike