
On what proved to be the coldest day of the winter so far (windchills of more than 30 degrees below zero), my friend Meggan and I decided to do some thrifting. I believe we officially qualify for ‘die hard’ status now, don’t you? But our local thrift store was having a 50% off preview day for members only (we are members), so we had to check it out. This piece proved to be the ‘find of the day’.

Can you see the giant flaw? Lower right corner? A huge chunk of trim was ripped off.
But the price on this was really right at a mere $15. And I could just picture using the same label cup pulls that I used on the book page dresser on it. Most of all, I knew that my handyman neighbor Ken was up for the challenge of repairing that trim.
Sure enough, I sent it home with Ken and a few days later he sent it back over with this patch job …
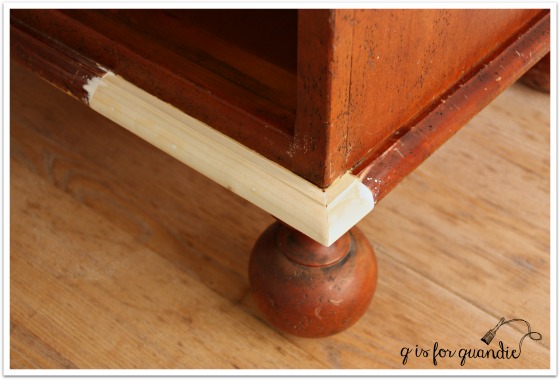
Super impressive, right? Honestly, this kind of repair just boggles my mind. I don’t know how he does it, and I can’t even begin to explain it. Let’s just reiterate how very lucky I am to have Ken living next door and leave it at that.
Once that repair was done, next I removed all of the knobs and filled the holes with wood filler. The fill didn’t have to be perfect because the holes are behind the new label holder cup pulls. With a ‘label’ in place, you can’t even see them, but if you take the book page paper labels out you can. So I filled them. I then sanded the whole piece. The existing finish was a little shiny and I wasn’t sure how milk paint would react with it, so when in doubt I tend to sand.
Next came a simple paint job using two coats of Miss Mustard Seed’s Typewriter. I sanded to distress and added a top coat of hemp oil.
Here is how that front repaired section looks after the paint job.
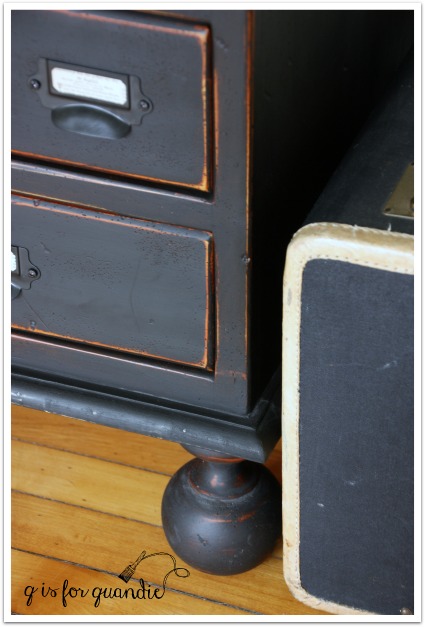
If you didn’t know it was there, I don’t think you would really notice it. But it does stand out a little in so far as it isn’t as distressed as the rest of the piece. Had I been really meticulous I should have stained the new wood first, then painted over it.
Once the paint job was finished it was time to attach the new label holder cup pulls.
Ken taught me a little trick to making sure they all lined up properly using a combination square. Do you have one of these? I bought mine at a garage sale for a couple of bucks, of course. It looks like this …
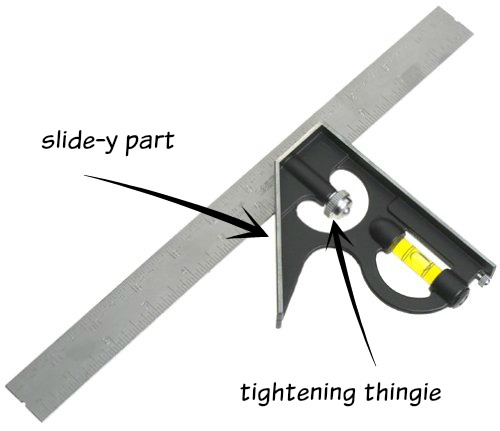
Basically you loosen up the tightening thingie which allows the slide-y part to move along the ruler part (I’m so technical!). In my case, I then decided exactly how far down from the top of the drawer I wanted to place the pulls. Once you have that measurement, you tighten it back up. Now it’s easy to measure for the placement of each pull …
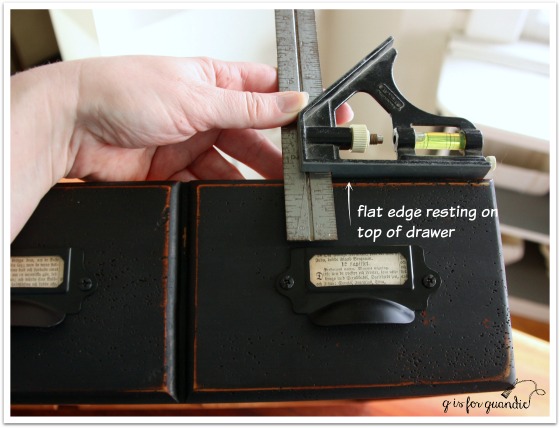
Just rest the flat edge of the slide-y part along the top of your drawer, then butt your label pull up to the bottom of the ruler part. You can slide the square along making sure that the pull is straight all the way across. Does that make sense? I then used a pencil to mark the holes for the screws, pre-drilled small holes, and then screwed the pulls on.
This worked great for the top to bottom placement, as for the side to side placement, I just eye-balled it. That could probably have backfired for me, but I did it carefully and was able to keep each pull centered on it’s faux drawer. I think I did a pretty good job keeping them all lined up. When I mentioned this to Ken, he asked me if my arm hurt. I thought he meant from having to attach so many pulls, which wasn’t really that hard, so I said “no, not really” and he said, “oh, I thought it might hurt from all that patting yourself on the back!” Ha! Yes, it’s true, I was overly proud of myself for getting these all on straight.

I used more Swedish bible book pages to fill the slots for labels.

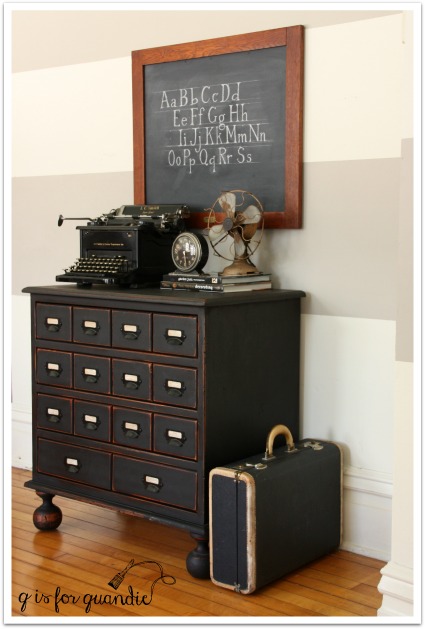
Are you wondering what makes this a ‘faux’ card catalogue? It’s because those aren’t really small drawers. Each set of 4 across is really just one drawer.

So much more functional than lots of small drawers! Although I did once see a real card catalogue turned into a wine cabinet. Each drawer held one bottle of wine. That was pretty cool. But this piece is really just a small dresser. I think it’s the perfect size to use as a bedside table. It would also work great in a foyer or as a TV stand. I also like the idea of using it in your home office with your printer on top and various office supplies inside. There are so many possibilities for a small chest of this size.
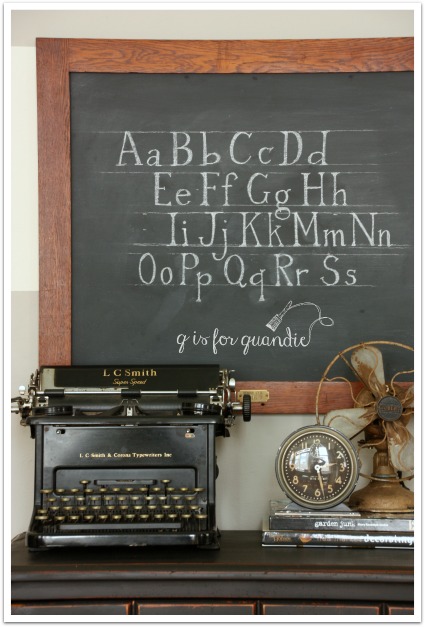
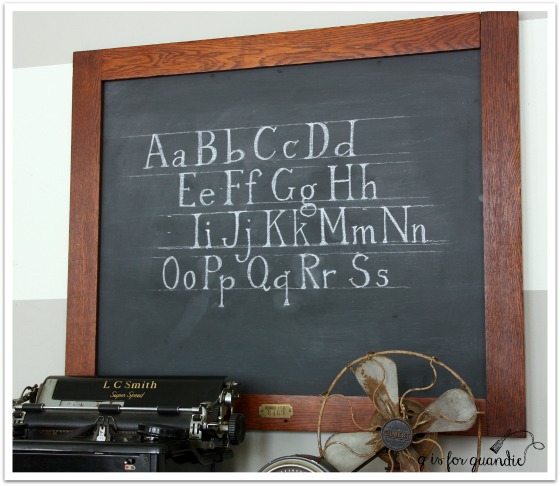
How do you like my chalkboard? This was a fun little project of its own! The frame actually belonged to a mirror that came attached to the book page dresser. I took it off the dresser. The size wasn’t the right scale for it. Plus it was poorly attached. I had to wonder if it was even original to the dresser. So, it never went back on. Later I removed the mirror from the frame and replaced it with some hardboard painted with chalkboard paint. Then I added a little brass number plate to the frame (at the bottom). Next I got out the Complete Book of Chalk Lettering that my sister gave me for my birthday and did some more practicing. I love how it turned out!

My chalkboard skills are slowly improving.
These make a great pair, don’t you think?

Both the chalkboard and the little chest of drawers are available for sale (chest of drawers is SOLD). If interested, leave a comment and I’ll email you with details.


This is one of my favorites! I have been lusting after a card catalog for quite a while!
Can you please email me the details? Thanks!
LikeLike
Will do Mary, thanks!
LikeLike
I knew you were going to knock this out of the park. I love that it’s dark, with the pulls and the book pages and the styling….just ahhhmazing! I knew Ken was handyman extraordinaire, but did not know he was a comedian as well. I will be using that one for sure…does your arm hurt, ha! You deserve to pat yourself on the back for this one, nice vision! Worth the frostbite 😉
LikeLike
Thanks Meggan, it was totally worth braving the cold!
LikeLike
Without a doubt this is one of my favorite rescues! I am such a fan of black painted pieces anyway and then you go and add the “label holder cup pulls” (now that’s a tongue twister) which are the perfect choice.That leveling tool is a pretty awesome gadget. Note to self be on the lookout for one. Cannot leave without commenting on the vignette which is top notch. The addition of the chalkboard is the cherry on top. So go ahead and pat yourself on the back. Love this! Love this! Love this!
LikeLike
That is a tongue twister, and a lot of words to type ‘label holder cup pulls’! Thanks Victoria! I’m going to go pat myself on the back some more now …
LikeLike
OH. MY. This is one of my favorites, too…you really did a beautiful job on this. The whole vignette is GORGEOUS.
LikeLike
Thanks so much Linda! This one was fun to pull together. Now you can see why my arm hurts so much 😉
LikeLike
This is gorgeous. The repair is amazing work. Paint finish, perfect. But changing out the knobs is genius! Love, love it. I like your technical talk too. I so look forward to your posts. I’m getting ready to paint some table legs in typewriter for my daughter’s table so this was good inspiration.
LikeLike
Thanks Becky! I love using the Typewriter, I think it’s one of the easiest milk paint colors to work with. I bet you’ll love it on your table legs!
LikeLike
awesome makeover!! Love those big ball feet! you did a great job. The chalkboard also is terrific.
LikeLike
Thanks so much Patty! Those big ball feet are kind of fun, aren’t they!
LikeLike
Gorgeous and Ken did a a great job with the repair. I just painted a piece with typewriter too!
LikeLike
Thanks Darrielle! I’ve got another Typewriter piece coming up soon as well. I love working with the Typewriter, it’s so easy to use!
LikeLike
Such an awesome piece! You turned it into some amazing! Love the vision you had for it – really incredible. I happen to have an old (real) card catalog.. I use it to store craft supplies, but it isn’t great storage with those long, narrow drawers. I’ve always thought about painting it white, but you have made me second guess it for black!
LikeLike
I’ve always thought the same thing about having lots of small drawers. It sounds good on paper, but in actuality they aren’t very functional. Maybe you could try the wine thing with yours though! Also, I really debated between white and black on this one. In the end I thought that having that many black label pulls on a white piece would look busy/cluttered. But that being said, I do think white would have been OK too. Best of luck painting yours!
LikeLike
What a terrific piece. Love the scale of it and the use of the label pulls. I think you may have mentioned where you bought those in another post. Would you mind sharing that information again. Thanks so much.
LikeLike
Thanks! I got the pulls at D Lawless online, click here for a link.
LikeLike
Amazing find on that frigid day!! I love the chalkboard. I looking for the right frame to make one. As always you did an amazing job.
LikeLike
Thanks Nilda! Good luck with your chalkboard!
LikeLike
Wow ! I would not be able to part with it. Had to chuckle when I saw your Swedish bible inserts. How very Minnesotan, here in Wisconsin it would have been German bible pieces. And as usually it was staged to perfection.
LikeLike
It is rather Minnesotan isn’t it 😉 Ha! Thanks Diane!
LikeLike
How very clever and talented you are. Wish I was closer. It might be mine! Love, love, love it!
LikeLike
You are too kind Monica, and I love it 😉
LikeLike
So nice! What’s your reasoning behind choosing to use hemp oil over waxing this piece? You have such a good eye!
LikeLike
Thanks Kathy! There are a number of factors that go into choosing a top coat. First, I’ll say that I only use hemp oil with milk paint. I think it can be used with chalk paint, but I’ve never tried it. You would not want to use it with Fusion paint because it would just sort of sit on top of the paint (I say that because I know you just stocked up on Fusion paint). Next, keep in mind that the hemp oil does not provide as much protection from dirt and water as wax. Here’s the protection hierarchy from most protection to least: tough coat sealer or other sealers, wax, hemp oil. But the main reason I usually use hemp oil with black paint is because it gives the richest, darkest black. All top coat products will change the color of milk paint, with hemp oil darkening up the paint the most. Here is a good visual example of what I’m talking about with the color:
LikeLike
Great transformation, Linda! Wouldn’t it look cool with casters?! You sure know how to turn a $15 piece into something fabulous. Great staging too! Stay warm, Cynthia
LikeLike
Beautiful! What’s the source for the cool handles?
LikeLike
Oh, I did leave that info out didn’t I? I had just used these same handles on an earlier piece where I gave all the details. The best part is that they are only 60 cents each (yes, you read that right, 60 cents!, screws sold separately). You can order them from D Lawless Hardware {here}. They aren’t super heavy duty, but they work well for a smaller, lighter drawer.
LikeLike
Hi Quandie, I absolutely love your faux card catalog makeover! I’d love to feature it on my second blog, DIY Furniture Makeovers (http://diyfurnituremakeovers.com) if that’s alright. I’d share one before and one after photo, a brief description, and a link back to your post. Let me know how that sounds. Thanks – hope you’re having a great weekend!
LikeLike
That sounds awesome Jen! Thanks so much.
LikeLike
Oh I love this!!! Such a cute idea!
LikeLike
Love this!
LikeLike
I am absolutely in love with the chalk board. Can you please tell me about the chalk lettering? What did you use?
LikeLike
I did that by hand using plain ol’ white chalk 🙂
LikeLike