

Remember I told you that I sent Mr. Q after two dressers recently? The first was the ‘how chippy is too chippy’ dresser from last week, and this is the second.

Before getting started on the paint job, there was a small fix on this one that Ken helped me out with. This dresser must have originally had a mirror. It would have been mounted onto the back and the mounting would have fit into two notches cut into the top of the dresser at the back. I did a crappy job taking photos of the fix, so you’ll have to excuse the poor picture.
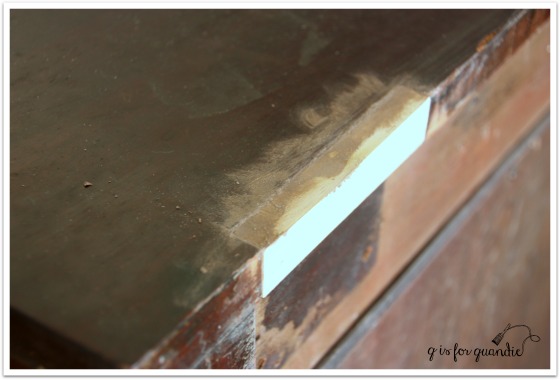
The lighter piece is an insert that Ken cut to fit the notch. He used glue to hold it in place, along with a few nails driven in from the back. I then patched the edges with another new wood filler I’m trying, Elmer’s ProBond in Walnut.
These are the kinds of flaws that make pieces good candidates for painting. If one wanted to strip and stain this piece, you’d have those two big notches at the back of the top. Do you try to match the wood? Do you leave the notches? Either way you’d probably end up with a so-so end result. But with paint, the repair is barely even noticeable. In fact, you might roll your eyes in disbelief, but I totally forgot about this repair by the time I had this painted. It wasn’t until I started editing the photos for this post that I remembered, ‘oh yeah, Ken fixed this one.’

See, you can’t even tell there is a patch back there can you?
As you can see in the ‘before’ photo, the existing stain on this dresser was dark, dark, dark and had a slightly reddish tinge. I was fully prepared for it to be one of the dreaded ‘bleeders’. You know, where the stain bleeds through the paint? I was pleasantly surprised to find that it was not. My course of action when I have a piece that might bleed is to paint the first coat and then watch for bleeding. If I see stain coming through the first coat of paint, then I seal it before moving on to coat number two. In this case, my plan payed off. No bleeding after the first coat meant I didn’t have to seal this one, thus saving myself the cost of sealer and the time spent to apply it.
If you’ve been following me for a while, you might know that my usual philosophy is to not fight against the existing color of pieces. In other words, with a finish this dark to begin with I would usually paint it in a dark color. Originally I was leaning towards Miss Mustard Seed’s Typewriter (black). Or possibly the Little Billy Goat Prizewinner (dark blue). But in the end, this dresser was crying out for light (or maybe that was just me projecting my own feelings onto an inanimate object on a dreary winter day).
After reviewing my paint inventory, I pulled out Fusion’s Inglenook. Good grief I love this color! It’s just so pretty.

In addition to being pretty, I am once again impressed with Fusion’s coverage. It did take two coats to cover this piece, but look again at how dark it started out! Going this light in two coats is pretty impressive.
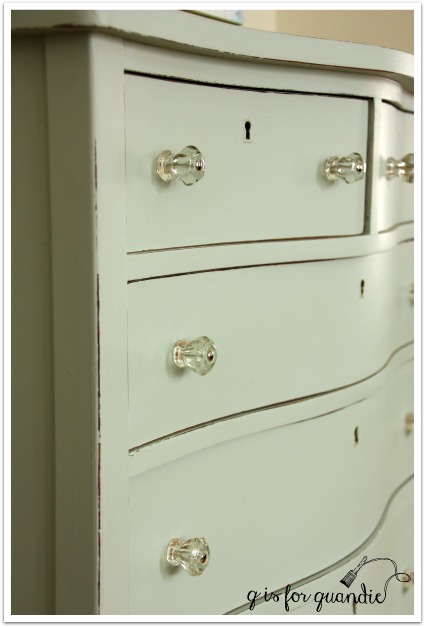
And of course, the second real benefit of the Fusion, I didn’t have to use a top coat! I sanded the edges for a distressed look and I was done. I accomplished this makeover (not including Kens’ repair) in two evenings after work. The first evening I removed hardware, lightly sanded, wiped it down with TSP substitute and painted the first coat. The second evening I painted a 2nd coat of paint before dinner, watched an episode of The Blacklist (James Spader, who remembers when he had hair?) while it dried, sanded the edges and replaced the hardware. Bam! Done!

Isn’t this dresser just a little charmer? I love that curved bottom on the lowest drawer, and the curve of the front two legs. This piece is just full of subtle curves. I purposely left the paint job simple so that the design of the dresser could speak for itself.
You’ll notice that I replaced the hardware with glass knobs. The wood knobs were still in good shape. I could have opted to just paint them and put them back on. In fact, I most likely would have done that had I chosen a dark color for this one. But this color was calling out for pretty glass knobs. Right?

Like adding sparkly jewelry to a pretty outfit.
This vintage alarm clock was the perfect color to use for staging.

It’s still set to midnight from New Year’s Eve!

So what do you think? It’s hard not to be charmed by this pretty little dresser isn’t it?
Linked up with: the FAB Friday link party.

Such a pretty piece love the lines, the color and the glass knobs. Two thumbs up!
LikeLike
Thanks Victoria.
LikeLike
It really is charming! I love the color and the glass knobs, too…great job!
LikeLike
Thanks Linda. Working on this dresser reminded me how much I still love glass knobs!
LikeLike
So pretty, I love that color and the shape. The glass knobs look perfect and the staging is simple and effective. This will sell fast!
LikeLike
I think so too! Although I have to knock on wood when I say that. Don’t want to jinx it!
LikeLike
This is a beautiful piece and you did a great job ! I learned a great lesson through this blog, and is not to fight the with the original color. I just painted a really dark dresser from the 1930’s with old white from Annie Sloan. It bleeds through some areas and I need it to shellac and now I have some light spots on the drawers that I need to fix. I may have lo light sanded and paint it again.
LikeLike
I have been in your shoes many times Nilda! Trying to go from a really dark stain to white is almost always problematic. I’m going to be reviewing a new product in a week or two, a clear primer that seals ‘bleeders’. I haven’t tried it yet, but I’m optimistic about it. Also, Fusion makes a product called Colour Blocker that is designed to be used under white paint. It doesn’t really save you any extra coats of paint, but it is a cheaper product than paint (it’s made with recycled waste pigment, so you can feel good about the environment when you use it). I does not block stains (important to know), but just saves you some money in paint when going from dark to light. So, if you are determined to paint a dark piece white, there are some remedies you can use to make it easier. But in the long run, if you really want to save time, money and headaches just take my advice and don’t fight the original color!
LikeLike
Thanks !! I will be saving a lot of time, money and headache for now on 😊
LikeLike
Charmer for sure and I am glad you went light with this one! I love Inglewood too!
LikeLike
It’s such a beautiful color!
LikeLike
Gorgeous!
LikeLike
Thanks Cynthia!
LikeLike
Wow, it’s gorgeous! I have used Fusion Mineral paint and really liked the coverage. That color is beautiful. I think I will have to give it a try.
LikeLike
Thanks Susan! I can’t gush enough about this color. This one and Laurentien are my favorite Fusion colors.
LikeLike
Love this piece. However, I am partial to the wood knobs so I started thinking how I might have used them. I thought about painting the top two drawers and the bottom drawer a darker shade of green and then painting the knobs in that darker color too. Maybe even painting the top the darker green. I really like more than one color on a piece, but I know that requires time, patience and cleaning of brushes. =)
LikeLike
There are always so many possibilities when refurbishing vintage furniture. That’s the beauty of it I think! This dresser would have been lovely in any number of different paint jobs.
LikeLike
Love the color choice and especially the glass knobs. You are right when you say it dresses it up! Beautiful lines and beautiful styling. As usual.
LikeLike
Thanks Terri!
LikeLike
Great job! Love the lines of that dresser–so pretty. I haven’t tried Fusion paint but will have to find a dealer nearby or order some. I have an old china cabinet that I am going to be starting on soon for my home and it’s dark right now and I want to go light.
LikeLike
As I mentioned in my comment to Nilda, Fusion makes a colour blocker that helps when painting white over a dark stain (refer to that comment for details). So if you are going white, that might be an option for you too. Best of luck on your cabinet!
LikeLike
Very pretty and absolutely charming. Love the colour…
LikeLike
Thanks Linda!
LikeLike
Hi Mrs.Q- guess what —I kind of like this one – pretty colour -I think that your Mom would too – cheers – Betty from snowy Ontario.
LikeLike
Ha! You know Betty, I think you might be right! My mom would like this one 😉 Hope you are enjoying that snow.
LikeLike
What a transformation! she’s beautiful. Also love the glass knobs. Just started following you. Can I ask where do you buy your knobs? Sometimes they cost more than the dresser I’m fixing😊
LikeLike
I know exactly what you mean Mimi! I get my knobs at Hobby Lobby (only when they are 50% off, which is regularly) or D Lawless Hardware. D Lawless has free shipping on orders over $50, so if you stock up when you order you can save the shipping cost. They also have a really nice selection of glass knobs in different sizes and colors. By the way, the knobs on the two upper drawers of this dresser are from D Lawless, and the knobs on all of the lower drawers are vintage knobs that came off another dresser I had.
LikeLike