
This dresser was another craigslist find spotted by nnK. I really didn’t need to add to my stash of furniture to paint, but the look of this one really appealed to me.

Unfortunately, I once again forgot to get a ‘before’ picture of my own, so I am borrowing the picture the seller used in his craigslist ad (I hope he doesn’t mind). This one wasn’t in terribly bad shape except for those drips of stain under the key holes.
I knew I wanted to strip the top, and I also wanted to keep the original drawer pulls. That meant I needed to find a color that would work well with the wood tone, and with the brass pulls. I also definitely wanted to go with milk paint on this one, it was calling out for a chippy finish to play up its age. I also thought two layers of color would add to the whole effect. So I dug out my stash of MMS milk paint to see what I had.
I started with a base coat of Shutter Gray. If you’ve never used this color, I think its name can be a bit misleading. If you are expecting a grey (especially after seeing the little color dot on the package), you might be surprised how blue it is. I sanded the entire dresser by hand before I started painting (I also stripped the top first, always do this first, it’s a drippy process). The finish was very dry, and since I wanted to get some chipping I didn’t do too much sanding. I wiped the dresser down and then painted on a coat of the Shutter Gray. Then I went and started some laundry. When I came back to the dresser, I knew right away I was in trouble. There was A LOT of chipping. I went over it lightly with sanding block to knock off the loose paint, and this is what I ended up with.

Kind of a cool look, but not what I wanted. Don’t panic if this happens to you, this can be easy to fix. I just sanded it down much more thoroughly and added another coat of the Shutter Gray. The second coat had much less chipping. Here is how the same side of the dresser looks in the end after a 3rd coat of paint using my final color, French Enamel.
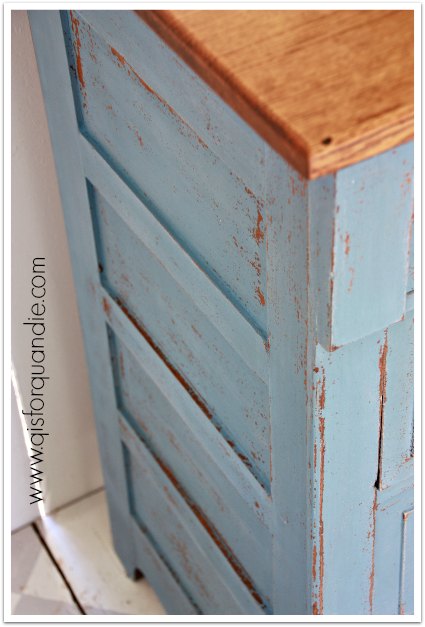
I did not use the bonding agent. Just the extra sanding I did helped the paint adhere better. I prefer doing this to using the bonding agent because you still get some chipping, just not an excessive amount.
Once the second coat of my base color, Shutter Gray, was dry, I used canning wax on the edges and around the key holes. The idea was to get a resist there with my next color so the Shutter Gray would show through. I followed up with just one coat of French Enamel. The results were a little more subtle than I was hoping for. Next time I’ll know to be more generous with the wax, or perhaps I’ll try Vaseline.

I’d never used French Enamel before, although I’ve had this bag in my stash for ages. Up until now I’d always passed it over in favor of some other color. That was a mistake. Now that I’ve actually used it, I know what I have been missing. It’s gorgeous, a much more saturated blue than I was expecting. I have to say, I had a really hard time capturing the true color in my photos. I tried three different times of day to get the lighting just right. I even tried setting a custom white balance on my camera, but I still got a million different variations of the color in my photos. I really think this is a color that you just have to try for yourself and see in person.
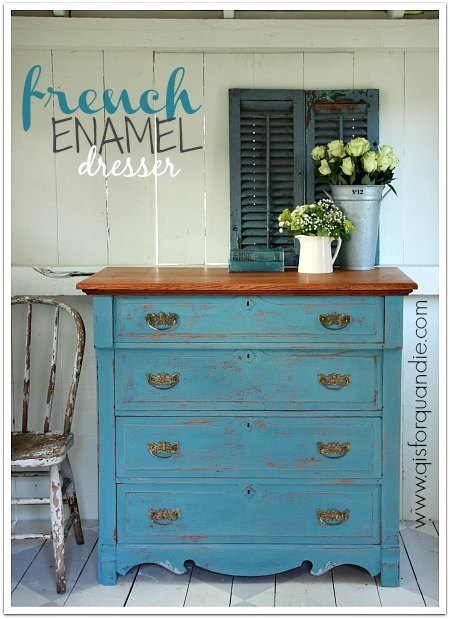
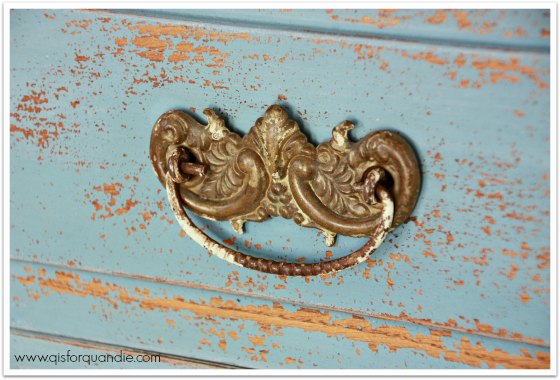
I’m glad I kept the original hardware. It has some great patina.
I staged it with flowers that were white and chartreuse. Yes, those roses really are a pale green rather than white


Does anyone need a vintage farmhouse dresser? This one is for sale for $225. Ooops, sorry you missed it, this one is sold.

Gorgeous Makeover! I love the colour you chose, I love it when people player paint, it looks so much more authentic with the chippy pieces!
LikeLike
Thank you for the kind comment! And can I say congrats to you for being featured by Miss Mustard this week! Your dresser is gorgeous!
LikeLike
What a gorgeous color! This baby is beautiful. Is that the galvanized flower container you scored recently with a # stencil added? Love your styling those roses are to die for.
LikeLike
Nope, that’s a different flower bucket. Good eye though, they are very similar. Thanks Victoria!
LikeLike
I love this! I so wish I was close enough to buy it!!!
LikeLike
Well, hopefully someone nearby will love it too!
LikeLike
So pretty! I love that color and I love how it chipped! I just had a very similar thing happen but it was easy to sand a little and paint some more. Love Milk paint!
LikeLike
Once you get the hang of it, milk paint is really fun to work with. I love a good chippy piece, and I know you do too!
LikeLike
You are one of my favorite blogs! ❤️ I have a question about milk paint. Do you sand between each coat? Your pieces always look so great! Great color choices! Then to seal, just use a wax? Buff real good?thanks!
LikeLike
Thank you so much Cheryl! I do not normally sand between each coat. I did so this time just to improve the adhesion of the paint. As for sealing, I use either wax or hemp oil. It just depends what look I’m going for. The hemp oil will darken up your color more than the wax. Also, wax provides a little more protection than the hemp oil does. I can’t truthfully say I ‘buff real good’, it’s more like I buff a semi-adequate amount 😉 LOL. Buffing is not my favorite.
LikeLike
Love it! This is a color I have yet to try so thanks for giving me a visual!! I tried Grain Sack over Eulalie’s Sky this weekend on a headboard. I’m thinking darker over lighter might work better. Is that what you normally do? It is definitely fun to play with milk paint!
LikeLike
I think I’ve done just as much light over dark as the other way around. For example the little table I just did using Lucketts over Boxwood. I also have used Trophy under Ironstone. I did a dresser with pink (mix of Linen and Tricycle) under Linen. The desk in my ‘q branch’ is Artissimo over Boxwood, a very nice combo. One of my favorite combos is Linen over Lucketts that I did on a wooden folding chair. You definitely need more coats of your 2nd color if it’s lighter though.
LikeLike
French enamel is a really neat color. I painted the inside of a cabinet with it and used it as an undercoat on the outside under linen. I was also surprised with how bright a blue it turned out to be!
LikeLike
I bet it was gorgeous on both of those pieces. I love both of those ideas, especially as an undercoat with Linen on top. I might have to try that sometime!
LikeLike
I love it! Makes me want to go break out my milk paint. It’s been awhile since I’ve had a super chippy piece. This turned out just gorgeous though!
LikeLike
Thanks Melanie! Some pieces, especially the older ones, are just meant to be chippy!
LikeLike
lovely
LikeLike