
A while back my friend Sue told me she’d seen a new Martha Stewart product. It’s a liquid chalk dauber that you can use with stencils on a chalkboard. This sounded just perfect for me since I don’t have great skills when it comes to free-handing a chalkboard design. Sue was kind enough to share a coupon for 40% off at JoAnn Etc with me, so I popped over there and purchased one (please note that this post is not sponsored in any way, I am just sharing my experience of this product with you).

The directions were pretty minimal. They just said to be sure and prime your chalkboard for best results. Have you ever primed a chalkboard? If not, it simply means to rub chalk all over it and then wipe it off. You only have to do this to a freshly painted chalkboard that has never been used before. Mine wasn’t new, but I primed it again anyway just to be on the safe side.

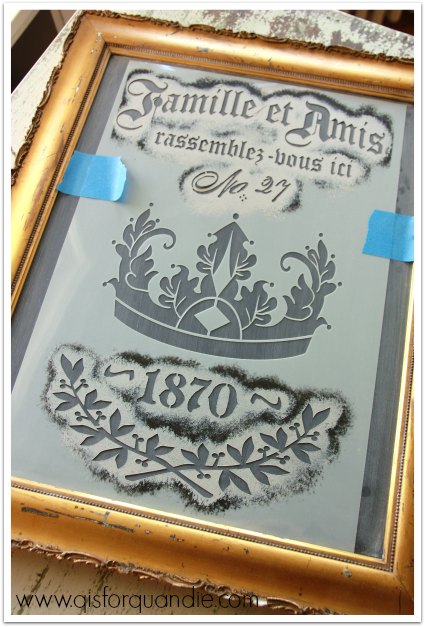
My ‘Family and Friends’ stencil fit the chalkboard perfectly, so I just taped it in place and was ready to start chalking.
I started out stippling the paint on with an up and down daubing motion, similar to the technique I use when stenciling. I didn’t really like how the texture of the stippling looked (on the ‘F” below), so then I tried using a sweeping motion instead (on the rest of the letters).

And honestly, that looked even worse, so I went back to stippling with the rest of the design. Once the stencil was removed, I just wasn’t impressed. I tried to salvage things by filling in some of the letters with actual chalk.


Hmmmm. I have to be honest. I’m not loving this at all. It looks messy and it certainly doesn’t look chalked. It looks more like a bad paint job.

It doesn’t look quite as bad from a distance, and it helps even more if you squint your eyes just a little.

OK, well, I’m grasping at straws here. It totally does not meet my standards.
I’m sure part of the problem lies with me and my technique, I went online to look for more instructions or even just some tips on how to use the product. I found a youtube video, and it recommended ‘pouncing’ the liquid chalk on much like I did. It also suggested wiping a little of the liquid off first, which I did not do. That might have helped. In the end, I think part of the problem is also the stencil I’m using. It wasn’t designed for use with a product like this. Using a stencil with skinnier lettering might work better (such as those made by Martha Stewart specifically for her liquid chalk).
Luckily, this product can be ‘erased’ with a damp sponge. I’m going to test that out next, and then head back to the drawing board with this product.

Linda, What a clever idea! I too LOVE the concept as my freehand skills are poor, but would also be unhappy with the final product. Martha’s chalk also looks too faint to be effective. Perhaps another follower will have some experience with these markers.
LikeLike
Maybe a 2nd coat would have helped too, but I still think I would have been disappointed with the ‘look’. I’m debating trying one of Martha’s stencils that are meant for use with the liquid chalk. She has a cute “Menu” stencil.
LikeLike
This is an interesting concept – while I was in Charleston we picked up a chalkboard for my daughter’s new place. I sent her instructions on priming it which she promptly took care of but so far she has not used it yet. The stencil idea made me wonder if this might be the answer.
LikeLike
I think a lot of people love the look of a chalkboard, but then when they get one they just don’t know what to put on it … or maybe that’s just me 😉 I’m not sure, but I’m always on the lookout for something interesting to put on mine.
LikeLike
Great idea, bummer it didn’t work. Have you ever tried the chalk pens? You can use on a stencil because it is sort of like a pen.
LikeLike
I have used the pens, and I’ve also used a white chalk pencil with my stencils. I thought this would be so much quicker and easier! I guess it always goes back to ‘quicker and easier isn’t always better.’ I think the chalk pencil gives the best look, but it also takes the longest!
LikeLike
By the time we get there and are ready for a chalk board in our new place you will have all the kinks worked out I hope.
LikeLike
Debbie,
does this mean you are moving close to your sister?
LikeLike
Yes it does. My daughter and I are moving there the beginning of July. Already have a home and job lined up. Will be nice to be close to family again. Has been 30 years, we figured out last week. Sad, exciting and scary all at the same time.
LikeLike
The cat is now out of the bag! Personally, I still can’t believe it. It might take a while to really sink in!
LikeLike
So now you see what it looks like whenever I try to paint with a stencil. I just can’t get it to not look sloppy. Looks just like this, never up to anyone’s standards lol. I’ve just about given up trying to do it.
LikeLike
Well, I can give you some advice on the stenciling with paint. First of all, be sure you are using a thicker paint. I never stencil with milk paint, chalk paint or latex. I always use the little bottles of acrylic craft paint that you can get at any craft store. If you are already doing that, the next piece of advice is to wipe your stencil brush on some paper toweling after you load it with paint. You want a dry brush. So … dip your brush in the paint, then wipe most of it off on the paper towel. It feels wasteful, I know, but this is the only way to keep your stencil crisp. Now, keep chanting in your head “less is more” as you pounce the brush on your piece. Keep your motion straight up and down. Remember, you don’t want to work any of the paint under the edges of the stencil, so don’t use any sweeping motions. Less is more, less is more. Go very sparingly with the paint, especially around the edges. If the first pass isn’t dark enough, add a second pass after it dries (usually only a few minutes), but still with a dry-ish brush. I know you can do it Jane! Now … if only I had taken my own advice with the liquid chalk!
LikeLike
Even worse – I can’t get my chalk off now. It’s been on a few months, and will not wipe off. I will have to repaint my board. Stay away from this product!
LikeLike
I had the same problem when I tried to remove it with a damp paper towel. But I had read somewhere that a magic eraser will do the trick, so I tried and voila, it cleaned up nicely. I’m referring to a Mr. Clean (or other generic brand) magic eraser. Give it a try!
LikeLike